Essential Guide to hsbCLT / hsbSIP | Nesting
Introduction
Masterpanel nesting is used in hsbcad to minimize the production waste of the CLT panels during manufacture.
This document will show you how to create a nesting and apply company settings to optimize the process.
General
You will find the nester in the ribbon at ...

There are two types of nesting as follows:
hsbNesting Basic
- The rectangle bounding form shape is taken into account during the nesting.
- You cannot nest in openings.
- 180° rotations of childpanels are not supported automatically, but can be done manually later on.

hsbNesting Pro
- The real form shape is taken into account during the nesting.
- Nesting in openings can be allowed.
- Childpanels are rotated automatically for an optimized result.

Setting nesting parameters
If panels are designed and grain direction is applied, click nesting on the ribbon
The MasterpanelManager will open.
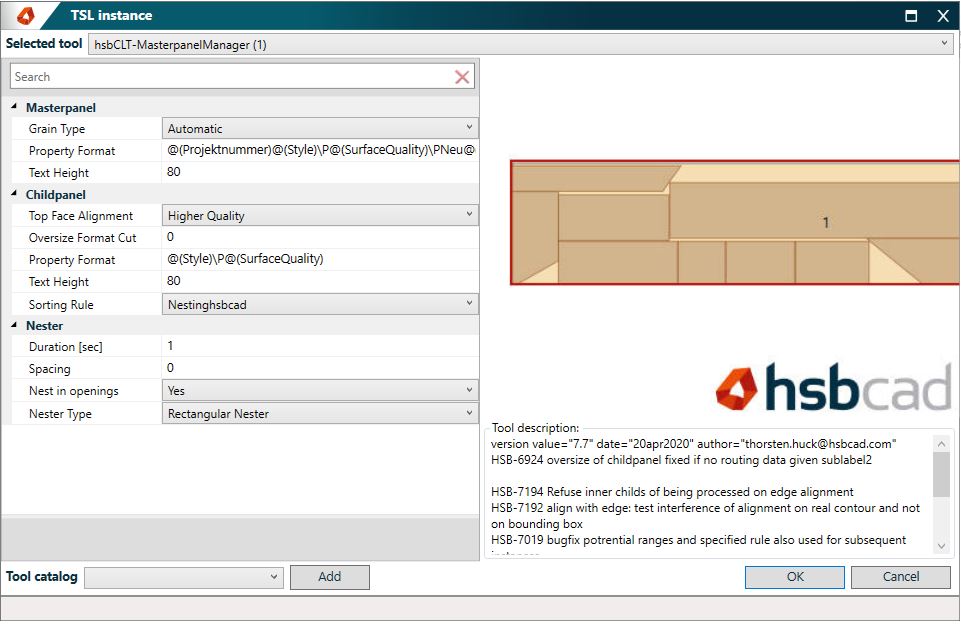
All setting can be saved in the tool catalog, and recalled for execution at any time
BLOCK__END
Set the properties for nesting in the following categories
Category Masterpanel:
Grain direction
- Automatic = Childpanel will be automatically grouped by grain direction.
- Length direction= Only childpanel with length direction are nested.
- Cross direction = Only childpanel with cross direction are nested.
Property Format
Set the value of the masterpanel properties and text displayed on the masterpanel.
BLOCK_CHECK_START
If unsure how to implement the properties, a useful tip is to insert once a nesting result. Selecting a the text of the nested masterpanel, right click, the custom functionality Add/Remove Format to select the properties from the list. You can than save the settings as catalog entry for future nesting in the masterpanel catalog settings.
BLOCK__END
Textheight
Sets the height of the text of the format properties
Category Childpanel :
(Childpanel are representations of the panel in your construction. They are only used to represent the position in the masterpanel)
Top Face Alignment
- Determine the alignment of surface quality of the child panel
Oversize Format Cut
- Defines an offset of the childpanel to the edges of the masterpanel.
Property Format
- Set the value of the childpanel properties and text displayed on the childpanel.
Text Height
- Text height of the childpanel properties.
Sorting rule
- Multiple sorting rules can be created. The sorting rules are defined in the XML file. See below.
BLOCK_CHECK_START
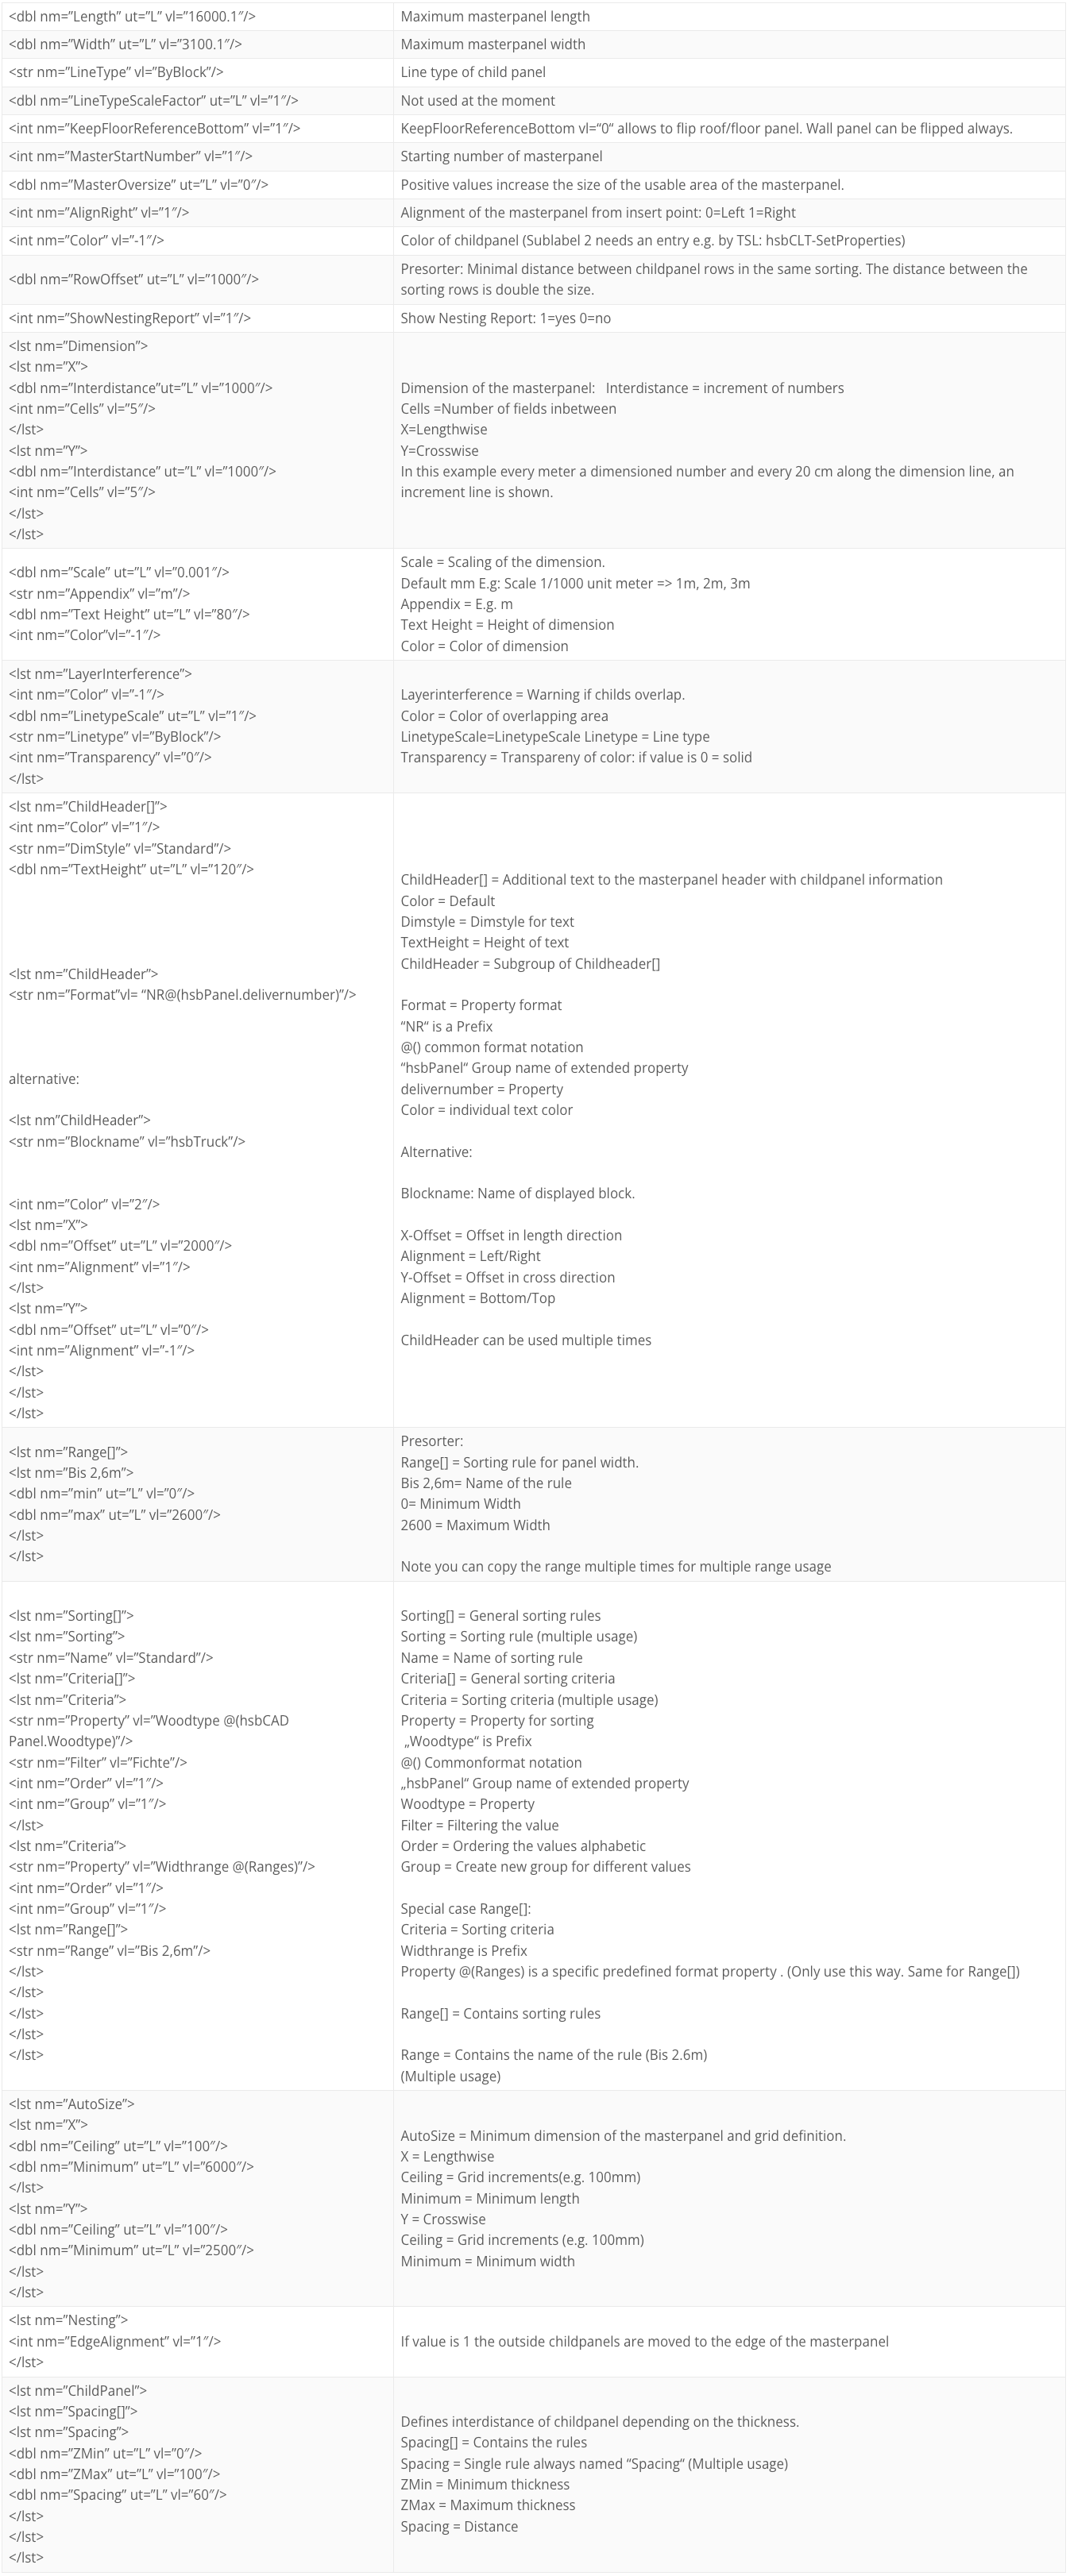
See further information for XML
BLOCK__END
Category Nester:
Duration [sec]
- Runtime of nesting per masterpanel.
Spacing
- Spacing between childpanels.
BLOCK_CHECK_START
The spacing value can be predefined in the XML file and will be used if value here is set to 0
BLOCK__END
Nest in openings
- Childpanel can be nested in openings of other childpanels.
Nester Type
- Select to use Rectangular nesting or Auto nesting
Create nested panels
If you are using sorting rules via XML, a preview of the sorting is shown at this point. Click left mouse button to start the nesting, which displays the sorted result. If you click right mouse button, the nesting is stopped and the presorting remains.
If no sorting rule via XML is used the nesting will start directly.
The progress will be shown in report.

BLOCK_CHECK_START
See further information of pre sorting XML
BLOCK__END
Presorting
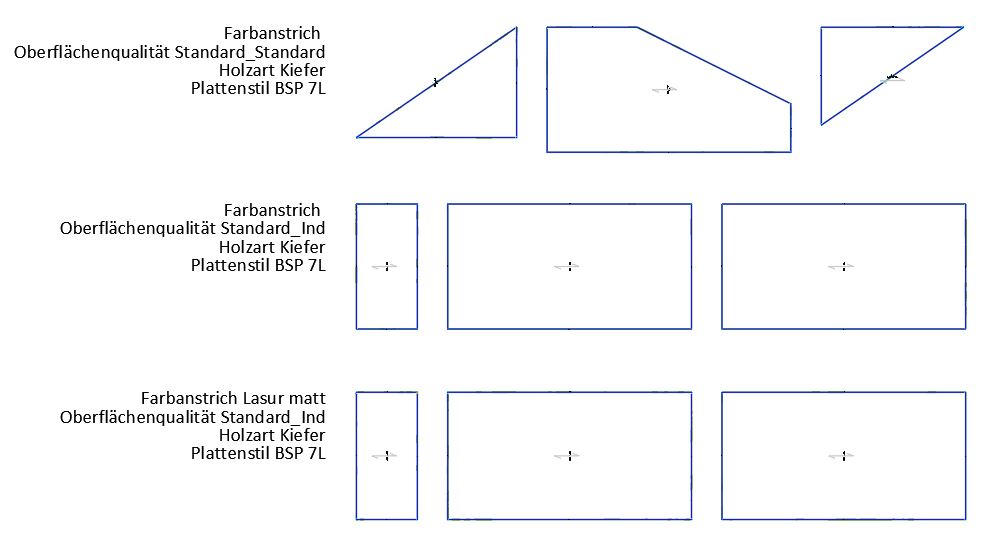
If a sorting rule in XML is used, a presorting is done based on the rules that are a custom criteria list of properties.
Only panels of the same group are nested together. Therefore panels that cannot be in the same masterpanel need a presorting rule. E.g. panel with a different wood type, surface quality or delivery sequence need a presorting, if the selection of the panel is not individually done.
This is why you can create multiple sorting rules, which are accessible in the dialog
The sorting criterias are shown in front of every sorting result.
If the result is not satisfying, the childpanels can be moved after the nesting to other masterpanels to get the optimum result.
Nesting
Example of a nesting result:
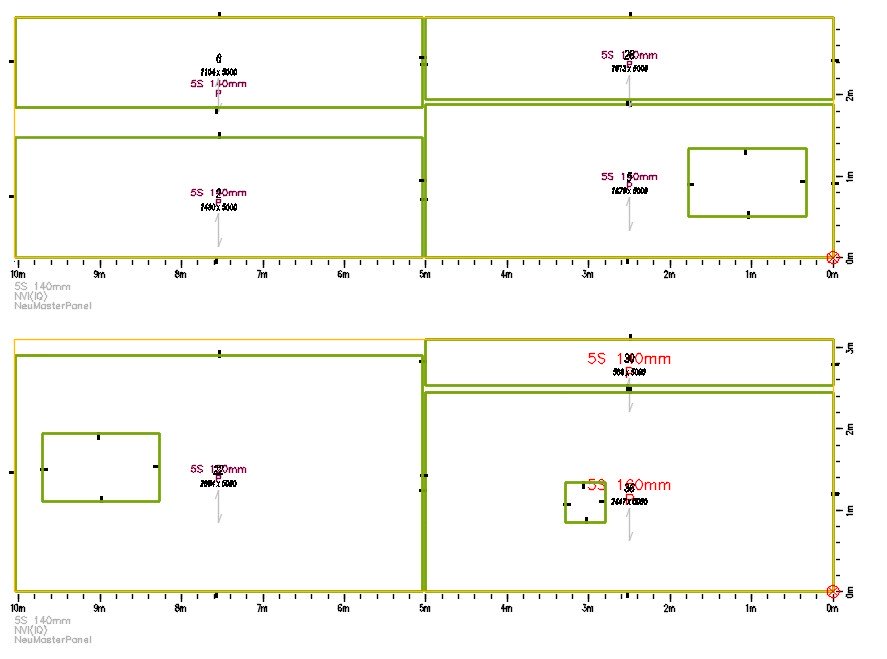
Each masterpanel is visualized with its childpanels.
The title in the bottom left of the masterpanel contains the properties of the masterpanel.
The properties of the childpanel is shown at the center of each childpanel.
Editing nested masterpanel
When nesting is complete, you have several opportunities to optimise the result further afterwards. You find the commands in the ribbon or context menu.
Commands in the ribbon:

Commands in context menu:
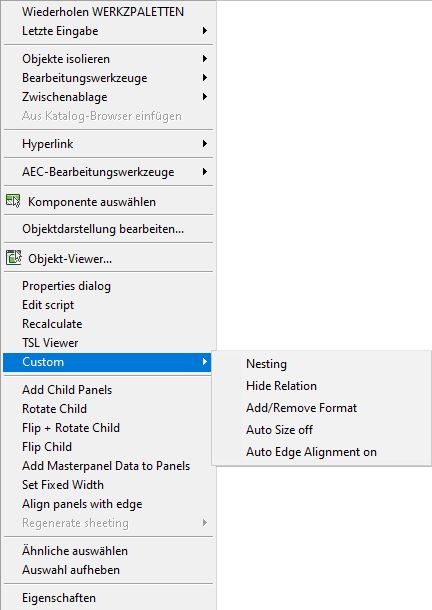
Ribbon commands

Rotate Child
Rotates the childpanel in the masterpanel

Flip + Rotate Child
Flips and rotates the childpanel in the masterpanel

Flip Child
Flips the childpanel in the masterpanel

Align panels withe edge
Aligns the outside childpanel with the length edge of the masterpanel.

Set a Fixed Width
Sets a fixed width of the masterpanel

Add Child Panels
Childpanel can be added to a masterpanel

Add Masterpanel data to Panel
The masterpanel data is wirtten into the childpanel

Show Relation
A line between a childpanel and the panel is drawn, therefore locating the location of the panel in the model

Hide Relation
The relation line is not shown anymore
Commands in the context menu
Some of the commands are repeated between the ribbon and the context menu.
BLOCK_CHECK_START
See further information on these commands in the ribbon
BLOCK__END
Additional commands found in the context menu are
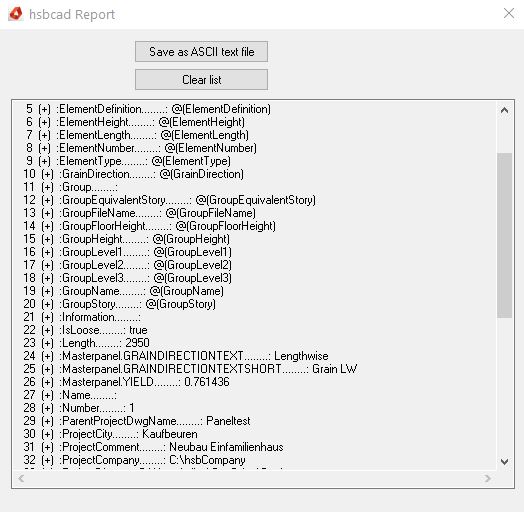
Add/Remove Format:
This will show a list of properties that can be add/subtracted to a display of masterpanel. The selected properties are used at Property Format field in the category Masterpanel.
The +/- in front of the number shows if the property is added or removed.
To add a property, select the number prefix shown for the property. Note you do not need to enter the +/-.
To exit and apply changes, enter -1
BLOCK_CHECK_START
If the value of a property is show e.g. @(ElementType). The property has no value in the drawing.
BLOCK__END
Set feeding direction:
Determines the side towards the machine.
Autosize On/Off:
This will set the maximum width off the masterpanel to the maximum width of the child panels. The masterpanel is still following the rules for minimum width and ceiling.
Auto Edge Aignment On/Off:
Uses the value of the extended properties in the XML file.
Extended properties editable in XML file
The definition of sorting rules, display configurations and other settings are stored in an XML file. You can import or export settings from within a drawing.
Import and export settings
The import/export is done with the command TSL_XML settings on the ribbon.

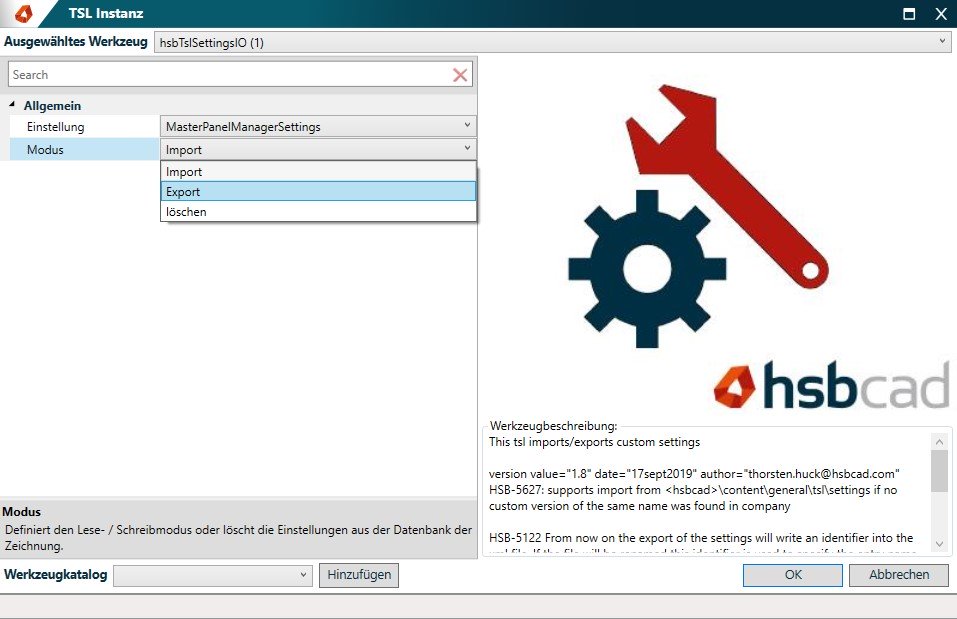
Category: General
Setting
- Select Setting and find „MasterPanelManagerSettings“ in the list.
Mode
- Select to import, export or delete the settings.
The XML file is stored in the company folder at : hsbCompany\TSL\Settings. The name of the Xml file is "MasterPanelManagerSettings.xml". You can edit the file with a text editor. E.g. Notepad .
XML settings
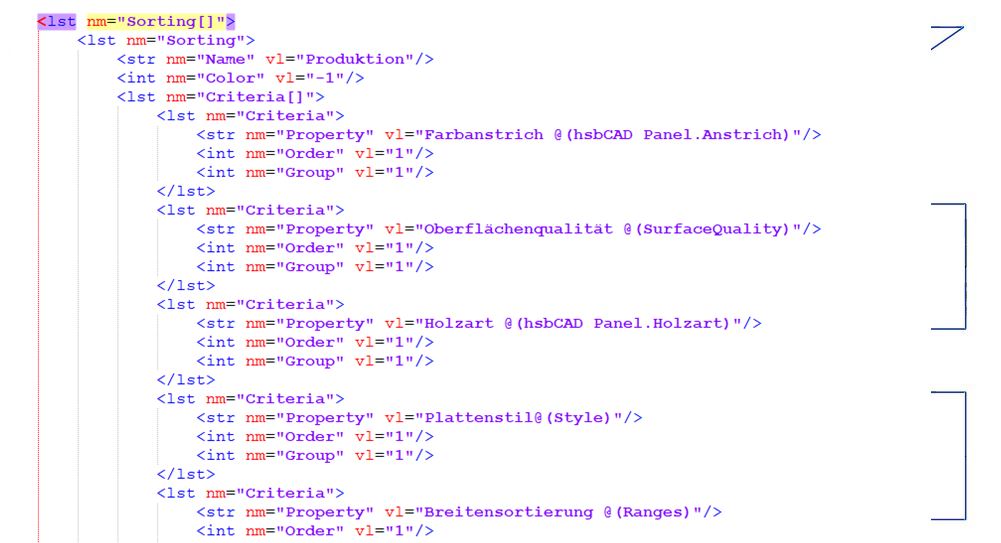
There are four different types to be recognized in an XML:
- <lst …> </lst> Is a list
- <str …/> Is a String, it contains charcters and words.
- <int …/> Is an Integer, a positiv or negativ natural number
- <dbl …/> Is a Double, is a positiv or negativ point number.
The entry of type "str", "int" und "dbl" is just on one line. The entry of type "lst" usually ends at a second entry, marked with a "/" (</lst>). If you click on the end, the start entry is highlighted too in Notepad . If the name contains square brackets e.g. (<lst nm="Sorting[]"> or <lst nm="Criteria[]">) you can copy enclosed part.
In the example you find multiple entries of <lst nm="Criteria"> in <lst nm="Criteria[]">. These are the different criteria used for a sorting rule to filter the childpanel. The area <lst nm="Sorting"> can be copied the same way to create multiple sorting rules. The idea to mark copied parts with square brackets is usually the general method of use.
BLOCK_CHECK_START
As a recommendation, it is useful to use the free notepad++ application for viewing XML files, because it handles the syntax of XML quite nicely. See here for further information to download
BLOCK__END
List of used entries in XML
