hsbShare | hsbStacking in hsbShare (Video)
This document will show you how to use the hsbStacking in hsbShare.
You will also need an uploaded a project you made in AutoCadⓇ Architecture or RevitⓇ to stack your Truck.
BLOCK_CHECK_START
Video's on hsbStacking
hsbStacking: hsbStacking in a nutshell
hsbStacking: Create Truck Configuration
hsbStacking: Create Packages
hsbStacking: Stack Elements
hsbStacking: Stack Prefabricated Elements
BLOCK__END
First of all open the hsbShare website and log in with your username and password.
To have access to the hsbStacking you need to have the hsbStacking module active on your license.
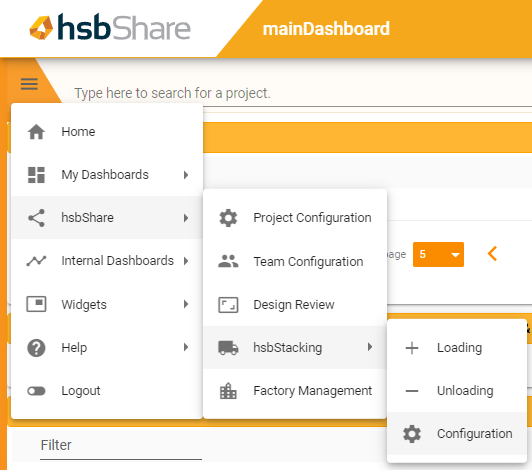
You can navigate to the Stacking by using the three lines in the top left hand corner.
Truck Configuration
If you navigate to the hsbshare\hsbStacking\Configuration, you will find 4 default trucks which you can use to manipulate, or you can create a new truck by clicking on the + symbol in the Truck Configurations widget.
When you start with a new truck, you can rename it by double clicking on the name new truckdesign.
In the Truck Layout Configurator you can now start to define your truck.
Each created truck is saved at any stage of the creation in the team that you have set as current. To change the current team you can click in the top right corner on User Account.
If you click on the green Load Body a Contextmenu will appear:

- Add LoadSpace: This will create a loading space on top of the truck body
- Add Axle: Creates an axle under the truck body
- Remove: Removes the truck body
- Edit: Opens the properties of the truck body to manipulate the dimensions and the height above the ground
- Copy: Creates a copy of the truck body
Add LoadSpace
It is possible to add multiple Loading Spaces to one truck body.
The Loading Space is needed to stack objects. The faces of the Loading Space will be used to align the added objects.
If you click on the Loading Space you can remove it, copy it or edit the dimensions of the space.
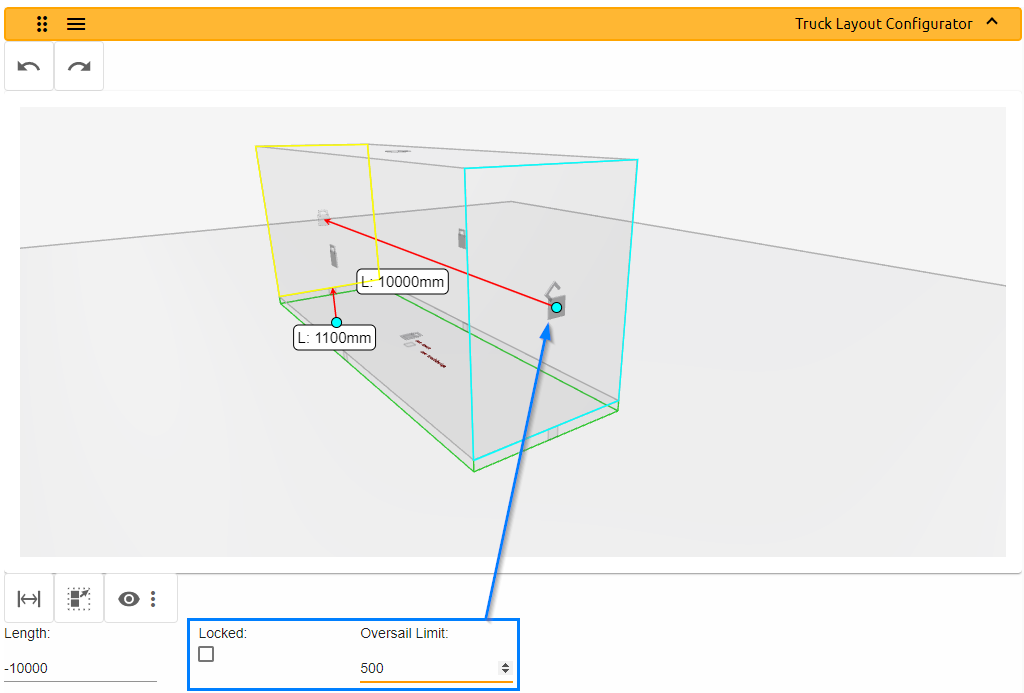
You can also click on the lock symbol that is in the middle of each face of the Loading Space:

1.Edit: This gives you the ability to open the lock symbol. That means that objects are allowed to stick out of the truck with a defined oversail limit.
If the Locked checkbox is unchecked, the lock symbol will be represented as open.
To exit this little submenu, just click on the Loading Space again.
2. Align: This can be used to align a face to another face. The selected face will appear blue. You can now select another face to align to, or use the little triangles on the truck body, to align to a face of the truck.
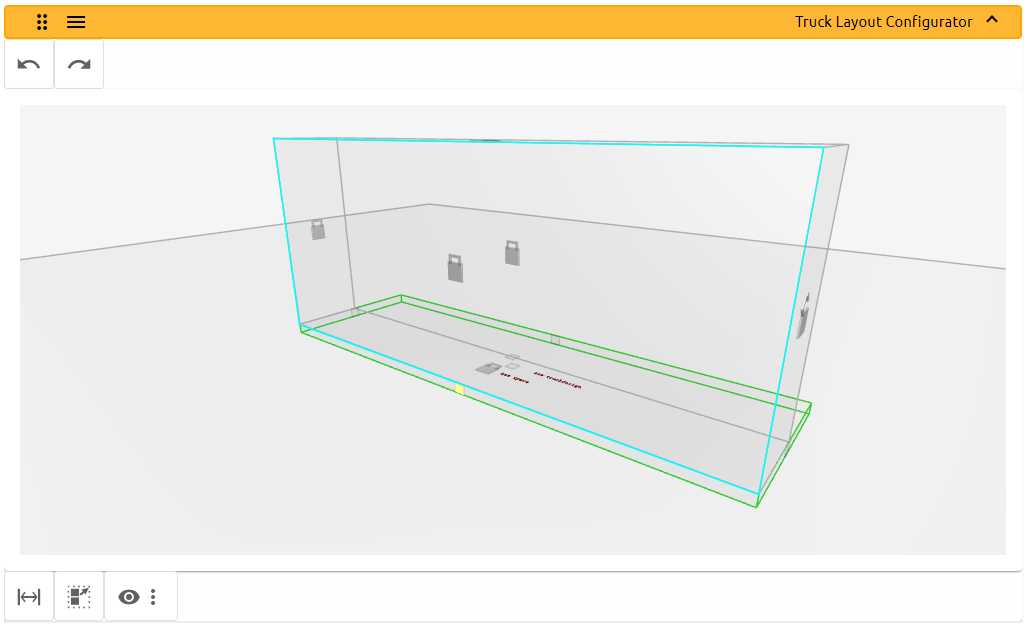
3. Stretch: The stretch command works in the same way as the align command, but instead of aligning a face to another face, it stretches the Loading Space to the selected face.
4. Offset: The offset command works in the same way as the align command, but you have a little submenu which allows you to define an offset.

Add Axle
With the add axle command you can place axles with wheels below the truck body.
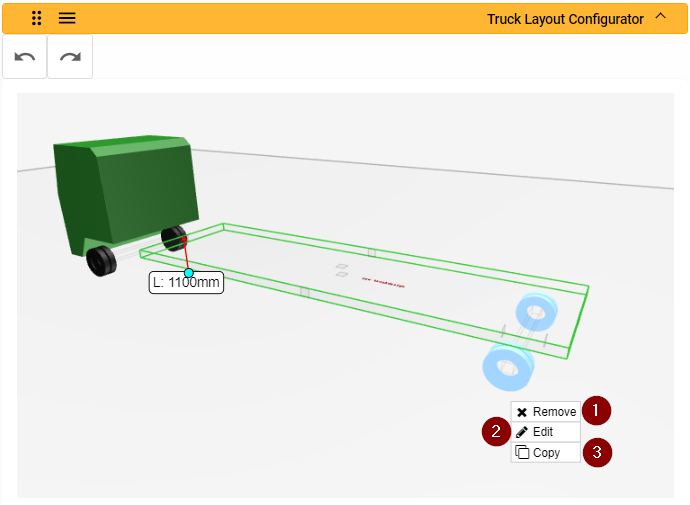
- Remove: This will remove the selected axle
- Edit: allows you to edit the diameter of the wheels and if there are double wheels or just single ones
- Copy: Can be used to copy existing axles
The axle has two grippoints which can be used to align or to offset the axle to a selected face.

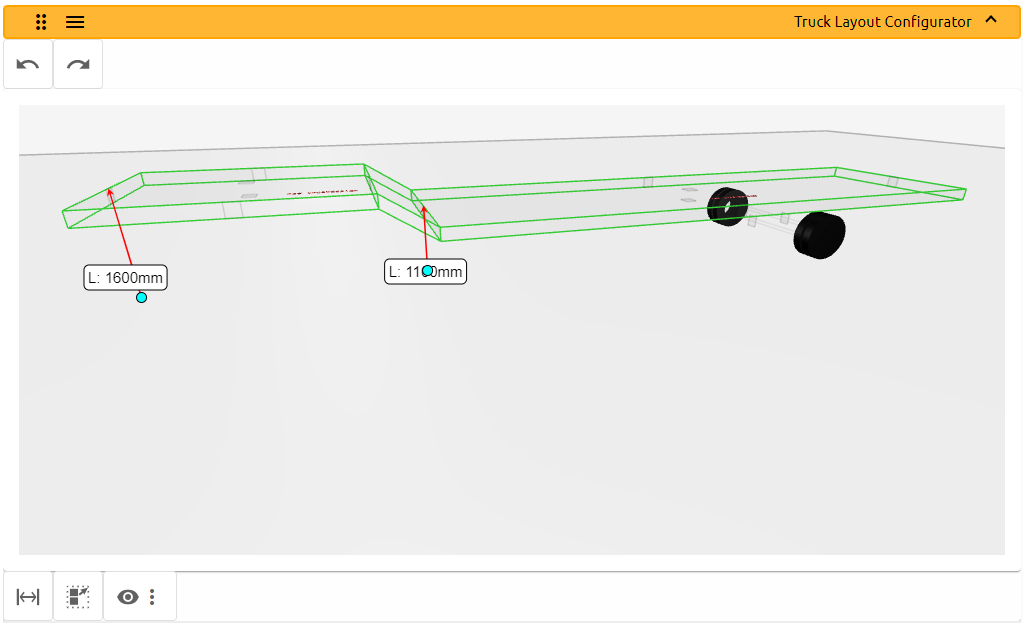
Join Loadbodies
If you copy a truck body the command Join LoadBody will appear in the context menu.

This allows you to create a connection piece between two existing truck bodies. Click on the command and then click on the second truck body that you want to connect with.
A special connection piece will be inserted. You can remove this piece by clicking on it and selecting unjoin LoadBody.
hsbStacking
To start a project you need to search for the name of the uploaded model.
How to Upload a project from AutoCadⓇ Architecture
How to Upload a project from RevitⓇ
If you are a new user you can use the search to find the project "Stacking Template"
Select the Project and the 3D – Model will appear in the Model Viewer.

Truck Loads
With the Truck Loads widget you can add trucks into hsbStacking and give them properties:
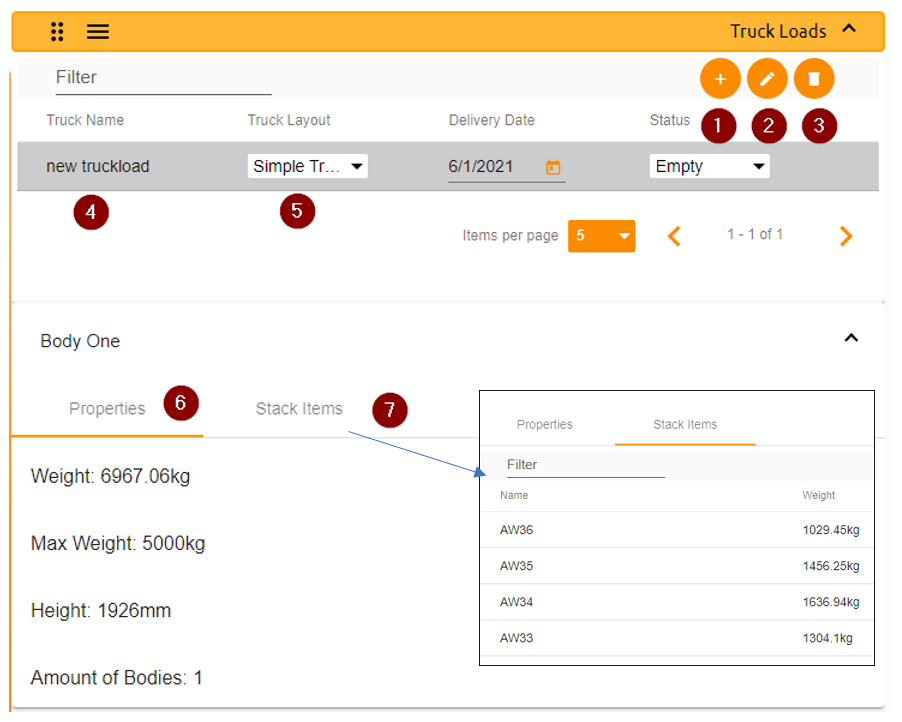
- Adding a new truck to the Project
- Editing the properties of the truck e.g. truck layout, location, delivery date and status. You can also add documents and comments to the truck in the truck edit dialog
- Delete the selected truck
- Truckname: You can change the name of the truck, by clicking on the name
- Truck Layout: Select a truck layout that was created in the Truck Configuration, or choose a template
- Properties: Represent the properties of the truck with the current loaded weight and height
- Stack Items: This is showing a list of all loaded elements or objects along with the weight
Truck Loader
To start stacking on the truck, you need to add a truck by hitting the + sign in the Truck Loads widget. Select the truck layout and define the properties. The truck will then appear in the Truck Loader widget.
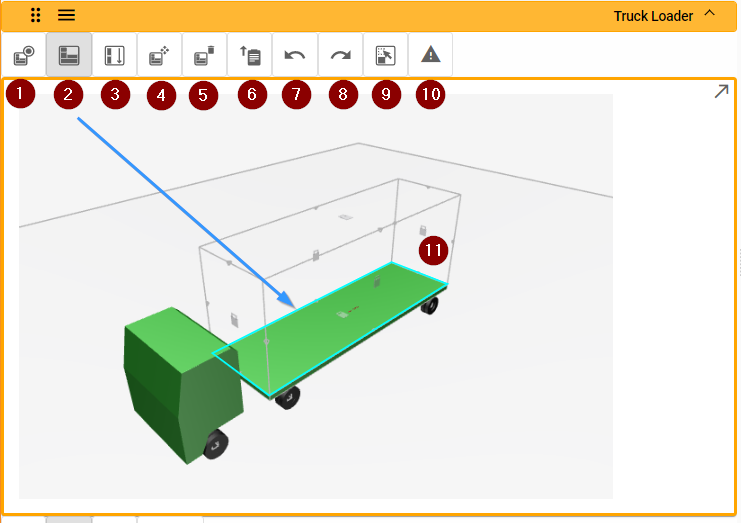
- Stacking: If the dot in the top right corner of the icon is grey, then truck stacking is active, which means that you can stack the Objects from the Model Viewer on to the truck. Only one stacking widget can be active, that means if the Truck Stacking is not active, then the Package Stacking is.
- Auto Stack: The autostack mode uses the active face (babyblue) as a reference plane to stack objects against.
- Stay on same layer: This will try to nest the next object on the same layer if there is enough space left. If not, it will start with a new layer.
- Manual Stack: With the manual stack, you can place the elements by yourself by picking points.
- Delete Stack: Is used to delete all the objects from the selected load body
- Export Report: Is creating an excel document with the current data of the truck and the loaded objects
- Undo
- Redo
- Snap on Entity: Is used to select either the parts of an element or the body of an element
- Show Warnings: Is showing warnings when objects are sticking out of a closed loadbody or oversail too much.
- Lock Symbol: is representing if a face is allowing oversailing or not. Can be set in the Truck Configuration or can be edited in place by clicking on it. You can either lock or unlock the symbol and define an oversail. You can also use the little triangles on every face to pick the face.
To load elements or objects on the truck, you need to click on the element you want to load in the modelviewer. The Element will then appear on the truck and turns invisible in the Model Viewer and the console, to indicate that this Element is already in use. When the Auto Stack is turned on, it will use the selected face (baby blue) as a reference plane. You can choose this face by clicking on the lock symbol or one of the little triangles that you can find on every edge.

As soon as an object is stacked, you can use the context menu to manipulate the position of the element. Some of the commands are needing further actions. If this is the case, you will get a hint on the bottom of the screen like this:

To navigate in the view or loading widgets you can use your mouse. If you click and hold the left mouse and drag around you can turn the view direction. With the mouse wheel you can zoom. If you click and hold the mousewheel, you can move around with a fixed view angle.
To cancel an active command you can use the escape button.
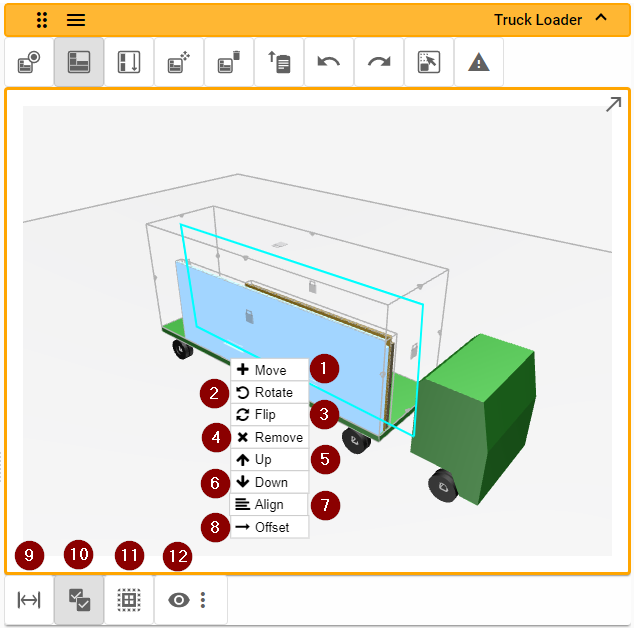
- Move: Select an origin and an endpoint
- Rotate: Rotate an element around the x-axis
- Flip: Flips the element by 180° around the y-axis
- Remove: Will remove the element returning it back to the Model Viewer
- Up: Move the element by one position away from the reference face
- Down: Move the element by one position nearer to the reference face
- Align: Select a face to align from, and one to align to
- Offset: Works in the same way as the align command with the addition to add an offset value to it
- Measure: Can be used to measure distances
- Multiselect: With multiselect turned on, you are able to select multiple objects and move, align, delete, etc. them all at once.
- Element/Entity Select: Can be used to select the whole element or single parts of an element
- View: Can be used to select the view direction
Truck Packages
With the truck packages it is possible to create a package out of multiple elements or objects. These packages can then be loaded to the truck.

- Adding a new package
- Editing the properties of the package e.g. truck layout, location, delivery date. You can also add documents and comments to the truck in the truck edit dialog
- Deleting the selected package
- Package Name: You can change the name of the package, by clicking on the name
- Add to truck: This button can be used to load a package to the truck. The darker font means, that the packet is already on a truck.
- Properties: The properties are representing the weight and the height of a packet
- Stack Items: This is showing a list of all loaded elements or objects along with the weight.
Truck Package Loader
If you don´t want to load every element directly to the truck, you can turn on the Truck Package Loader and create packages instead. The behaviour and usage of this widget is basically the same as in the Truck Loader widget with some extra functions. With the Truck Package loader we are creating something like a loadbody. You can load the package empty if you want and give some comments or clear names to it to use it as a placeholder for tools, screws etc.
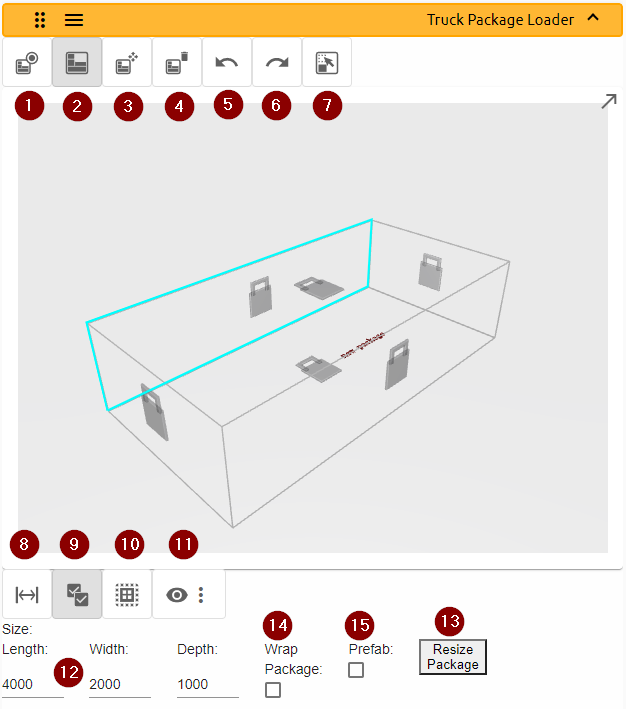
- Stacking: If the dot in the top right corner of the icon is grey, then stacking in a package is active, which means that you can stack the Objects from the Model Viewer into the package. If it is not active in the Truck Package Loader, then it is active in the Truck Loader widget.
- Auto Stack: The autostack mode uses the active face (baby blue) to stack objects against it
- Manual Stack: With the manual stack, you can place the elements by yourself by picking points.
- Delete Stack: Is used to delete all the objects from the selected load body
- Undo
- Redo
- Snap on Entity: Is used to select either the parts of an element or the body of an element
- Measure: Can be used to measure distances
- Multiselect: With multiselect turned on, you are able to select multiple objects and move, align, delete, etc. them all at once
- Element/Entity Select: Can be used to select the whole element or single parts of an element
- View: Can be used to select the view direction
- Size: You can either use these properties to define the size of the package or use Resize Package
- Resize Package: Is looking for the outermost edges of the bodies and extend the package to these points.
- Wrap Package: If this is turned on, the package will not be a box on the truck or in the export, but it will follow every edge of the combined objects
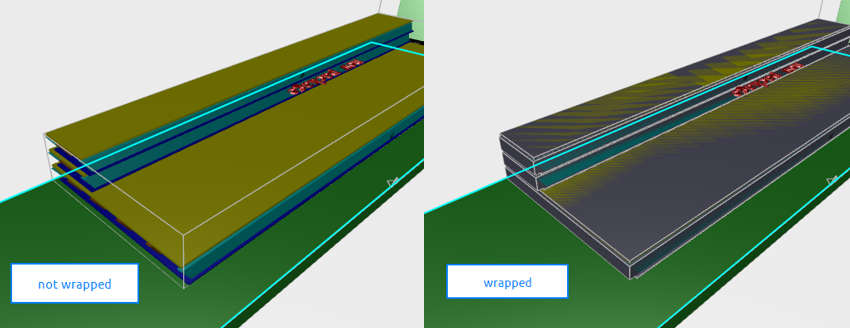
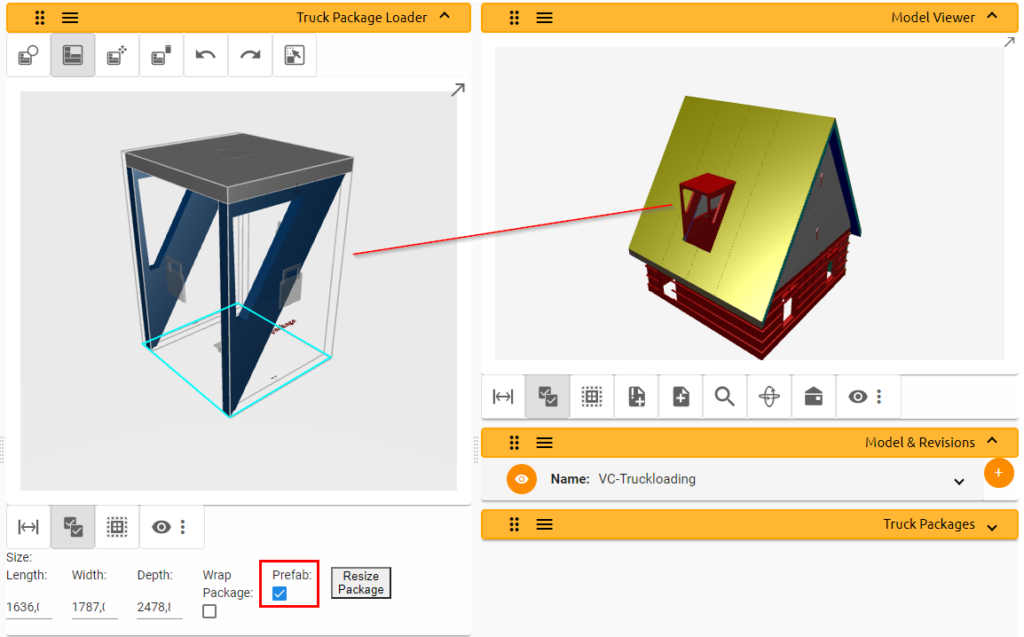
15. Prefab: Is used to load modules. The alignment from the selected objects will stay the same as in the Model
