
Jump to section
Can’t find the answer you’re looking for? Don’t worry we’re here to help!
Contact supportSheeting distribution for hsbWalls V23/24/25/26
This document will show you the different sheeting types in the Wall Detail Builder
If you want to return to the original document
How to make hsbWall details – Wall Detail Builder hsbDesign22/23/24/25/26
These are all the different Sheeting distributions
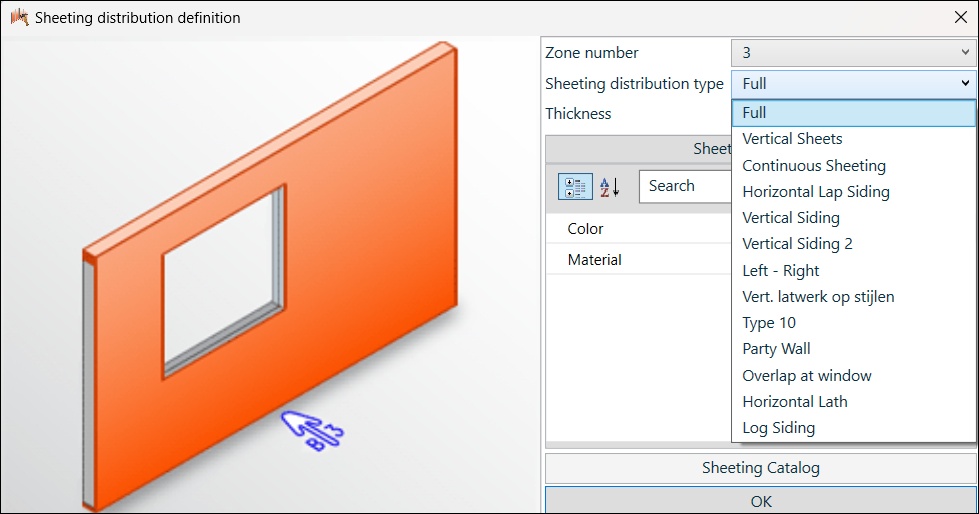
When using the Full
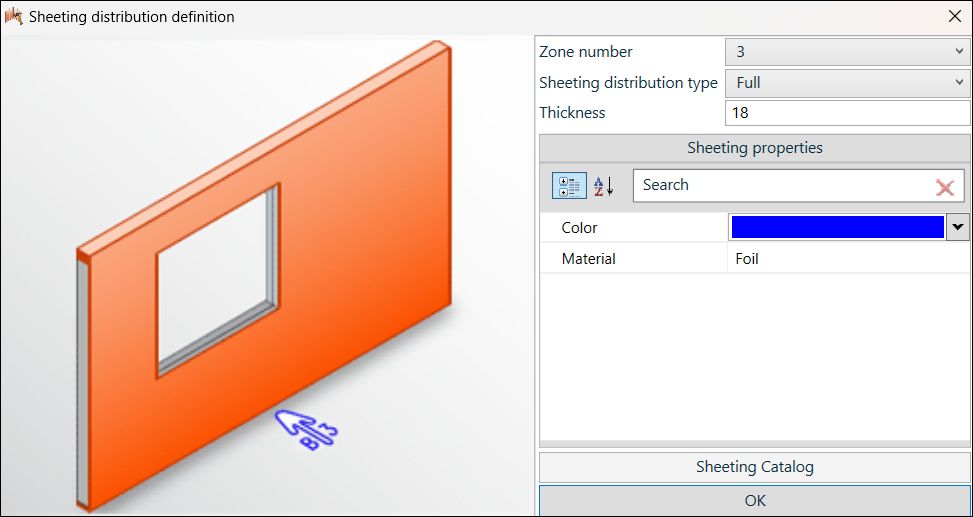
- Select the Full sheeting option in the Sheeting distribution type pull down menu.
Zone number – Select the Zone you want the sheeting in.
Sheeting distribution type – Pull down menu with the different options.
Thickness – This is the thickness of the sheet which can be changed here but might result in sheets overlapping.
Color – Select the color that you want the sheet to appear in.
Material – Enter the name for the sheeting material.
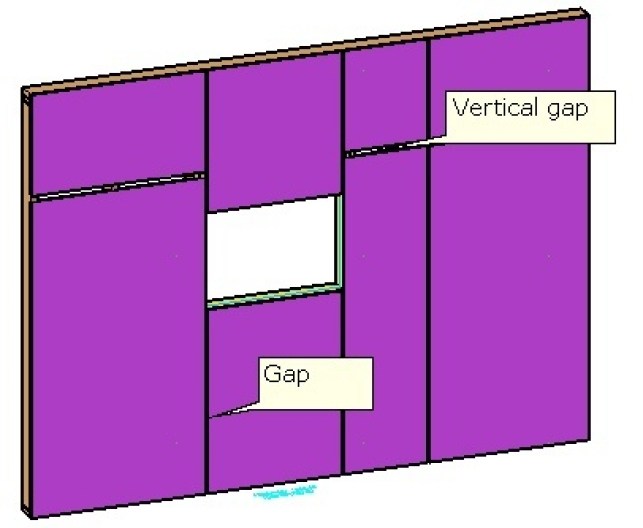
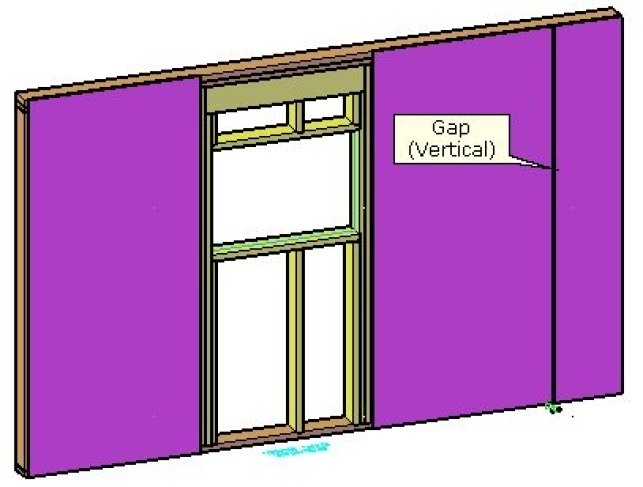
When using the Vertical sheets

- Select the Vertical sheets option in the Sheeting distribution type pull down menu.
Zone number – Select the Zone you want the sheeting in.
Sheeting distribution type – Pull down menu with the different options.
Thickness – This is the thickness of the sheet which can be changed here but might result in sheets overlapping.
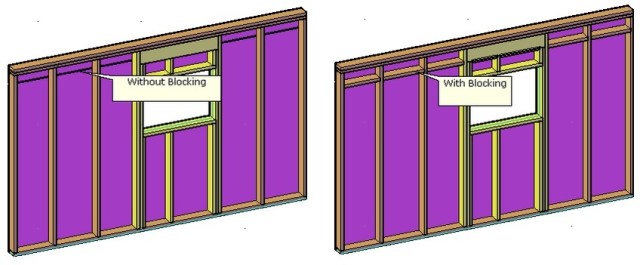
Blocking – Turn on this setting if you want blocking (noggins) between the sheet and the next sheet above it.
Color – Select the color that you want the sheet to appear in.
First Sheet – You can enter a width for the first sheet of the wall.
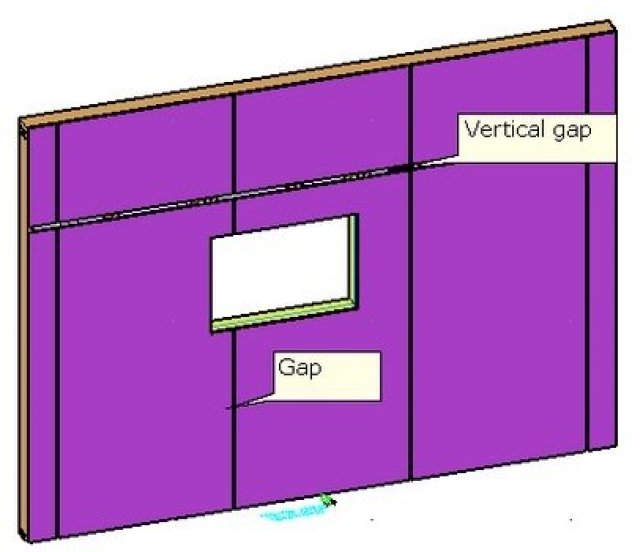
Gap – Specify the horizontal gap (distance between sheet and next sheet to the right or left).
BLOCK_WARNING_START
IMPORTANT: when using a gap, add the value onto the sheeting otherwise this will be subtracted from the sheeting.
For example: you have a sheet of 1200 and a gap of 20 your sheeting should be 1220 and enter 20 in the gap
BLOCK__END
Height Sheet – Enter a height for the sheet
Material – Enter the name for the sheeting material.
Vertical Gap – Specify the vertical gap (distance between sheet and next sheet to the top).
Width – Enter the width you want the sheets to be.
You can select predefined Sheeting in the Sheeting catalog.
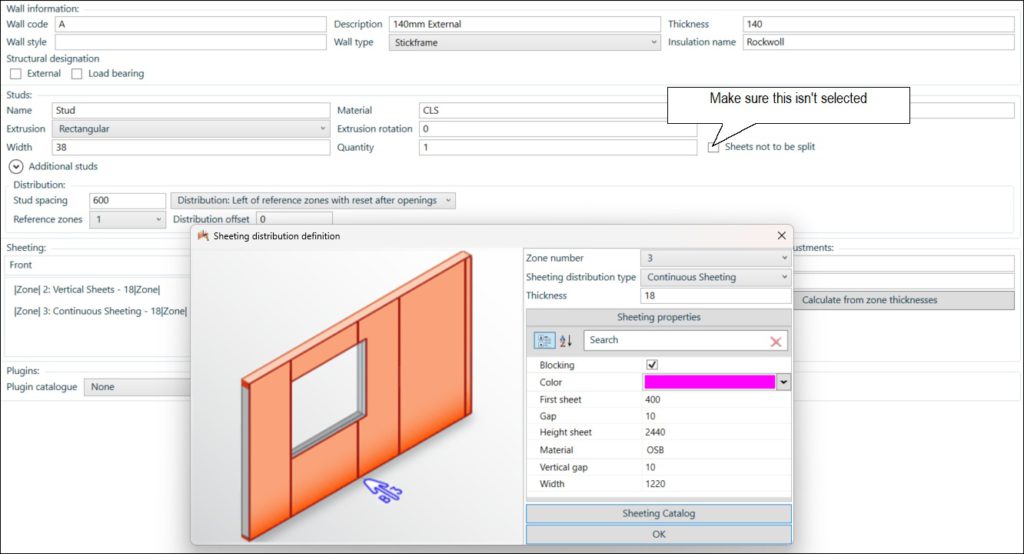
When using the Continuous Sheeting

- Select the Continuous Sheeting option in the Sheeting distribution type pull down menu.
Zone number – Select the Zone you want the sheeting in.
Sheeting distribution type – Pull down menu with the different options.
Thickness – This is the thickness of the sheet which can be changed here but might result in sheets overlapping.
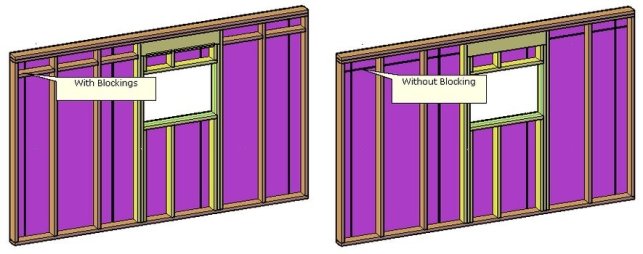
Blocking – Turn on this setting if you want blocking (noggins) between the sheet and the next sheet above it.
Color – Select the color that you want the sheet to appear in.
First Sheet– You can enter a width for the first sheet of the wall.
Gap – Specify the horizontal gap (distance between sheet and next sheet to the right or left).
BLOCK_WARNING_START
IMPORTANT: when using a gap, add the value onto the sheeting otherwise this will be subtracted from the sheeting.
For example: you have a sheet of 1200 and a gap of 20 your sheeting should be 1220 and enter 20 in the gap
BLOCK__END
Height Sheet – Enter a height for the sheet
Material – Enter the name for the sheeting material.
Vertical Gap ‐ Specify the vertical gap (distance between sheet and next sheet to the top).
Width – Enter the width you want the sheets to be.
You can select predefined Sheeting in the Sheeting catalog.
BLOCK_WARNING_START
IMPORTANT: Make sure that the Sheets not to be split isn’t checked in the wall detail dialog box. If you want 2 different sheeting zones to be staggered.
BLOCK__END
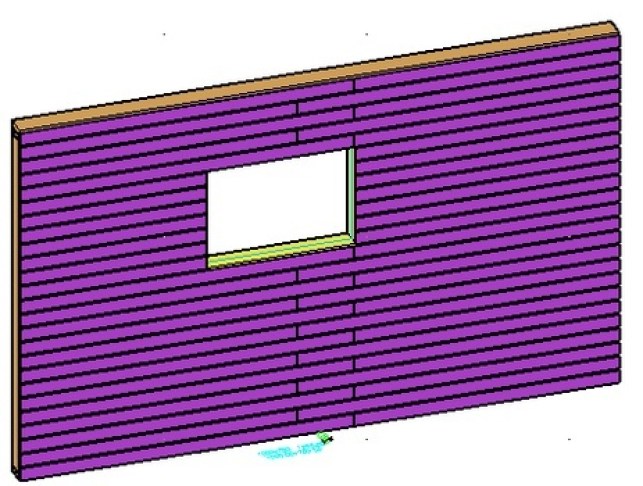
When using the Horizontal Lap Siding
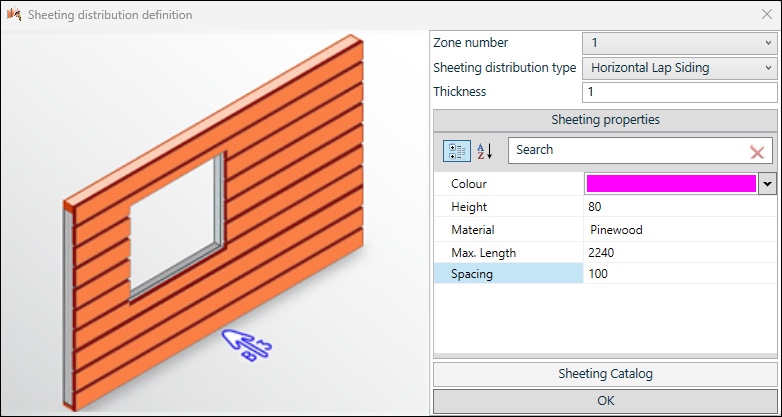
- Select the Horizontal Lap Siding option in the Sheeting distribution type pull down menu.
Zone number – Select the Zone you want the sheeting in.
Sheeting distribution type – Pull down menu with the different options.
Thickness – This is the thickness of the sheet which can be changed here but might result in sheets overlapping.
Color – Select the color that you want the sheet to appear in.
Height – Enter the Height you want the sheets (beams) to be.
Material – Enter the name for the sheeting material.
Max Length – Enter the max. Length of the sheets (Beams)
Module – Enter a value for the spacing (Horizontal gap). Height + gap=module.
BLOCK_WARNING_START
IMPORTANT: when using a spacing add the value onto the sheeting (beams) otherwise this will be subtracted from the sheeting (beams).
For example: you have a sheet(beams) of 80 and a gap of 20 your sheeting (beams) should be 100 and enter 20 in the Spacing.
BLOCK__END
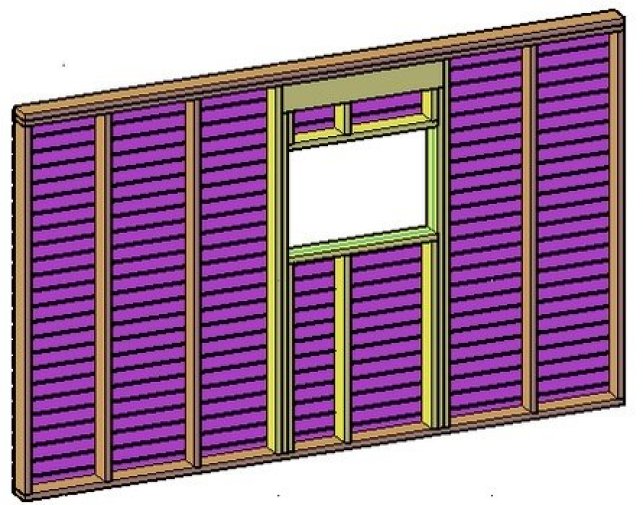
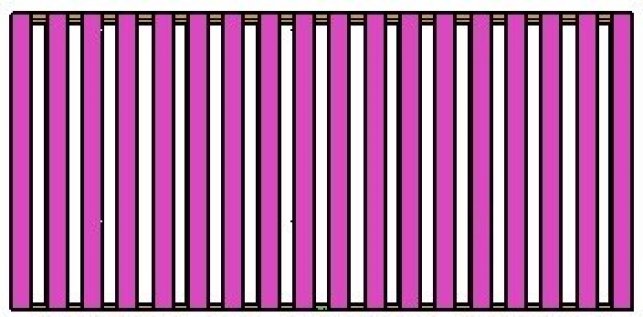
When using the Vertical Siding
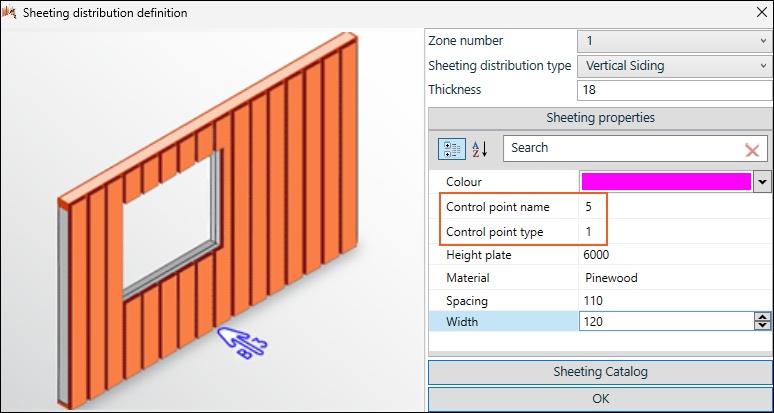
- Select the Vertical Siding option in the Sheeting distribution type pull down menu.
Zone number – Select the Zone you want the sheeting in.
Sheeting distribution type – Pull down menu with the different options.
Thickness – This is the thickness of the sheet which can be changed here but might result in sheets overlapping.
Color – Select the color that you want the sheet to appear in.
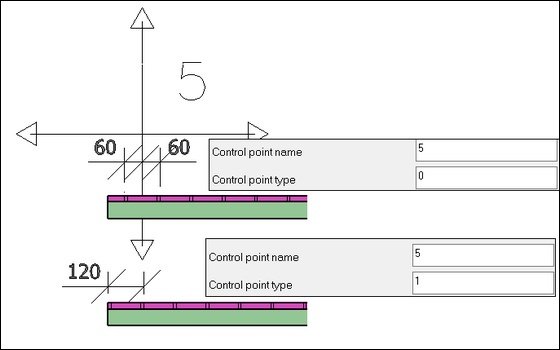
Control point name – Enter the name of the Control point you have used. (In this case it’s 5). Don’t forget to put the Control point in the Group (hsbConsole) you are using.
Control point type – Enter 0 or 1, if you use O this will center the sheet, if you use 1 this will place the sheets from the side.
BLOCK_WARNING_START
Make sure the distribution point is in the same group as the hsbWalls (hsbConsole). Otherwise it will not work.
BLOCK__END
BLOCK_CHECK_START
NOTE: If the Distribution point symbol seems to be too big, this has something to do with the units.
BLOCK__END
Height plate – Enter a height for the sheet.
Material – Enter the name for the sheeting material.
Module – Enter a value for the spacing (Horizontal gap). Height + gap=spacing
BLOCK_WARNING_START
IMPORTANT: When using spacing, add the value of the sheet+the gap you have a sheet of 150 and a gap of 50 your spacing should be 200.
BLOCK__END
Width – Enter the width you want the sheets to be.
You can select predefined Sheeting in the Sheeting catalog.

BLOCK_WARNING_START
NOTE: If the Distribution point symbol seems to be too big, this has something to do with the units.
BLOCK__END
1. Remove the Distribution point symbol out of your drawing.
2. Purge the drawing.
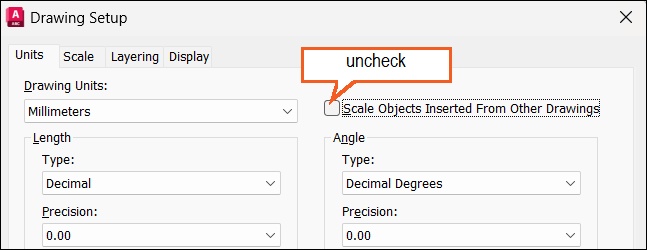
3. Type ‘units’ in the command line. This will open the ‘drawing Setup’ dialog box.
4. Uncheck the ‘Scale Objects inserted from other drawings’.
5. Insert the Distribution point symbol again.
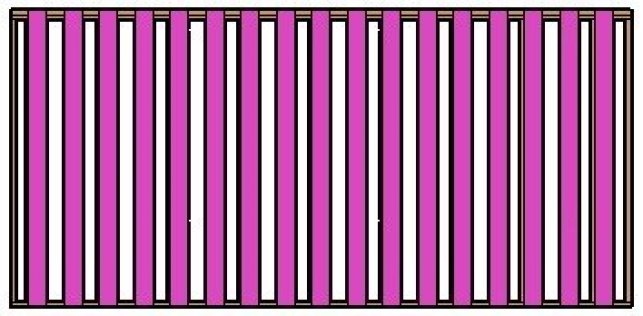
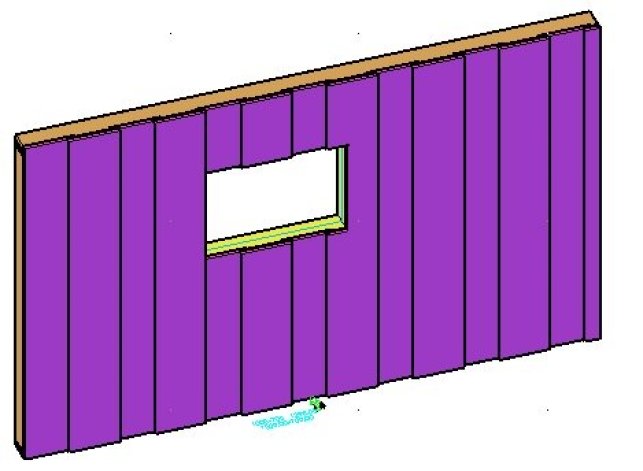
When using the Vertical Siding2
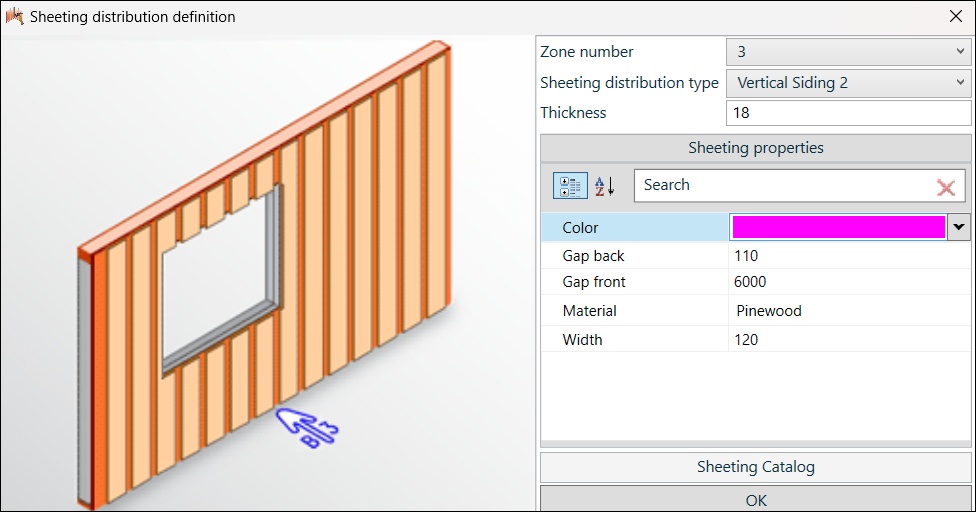
- Select the Vertical Siding option in the Sheeting distribution type pull down menu.
Zone number – Select the Zone you want the sheeting in.
Sheeting distribution type – Pull down menu with the different options.
Thickness – This is the thickness of the sheet which can be changed here but might result in sheets overlapping.
Color– Select the color that you want the sheet to appear in.
Gap back– Enter a value for the Back gap.
Gap front– Enter a value for the Front gap.
Material– Enter the name for the sheeting material.
Width– Enter the width you want the sheets to be.


When using the Left-Right
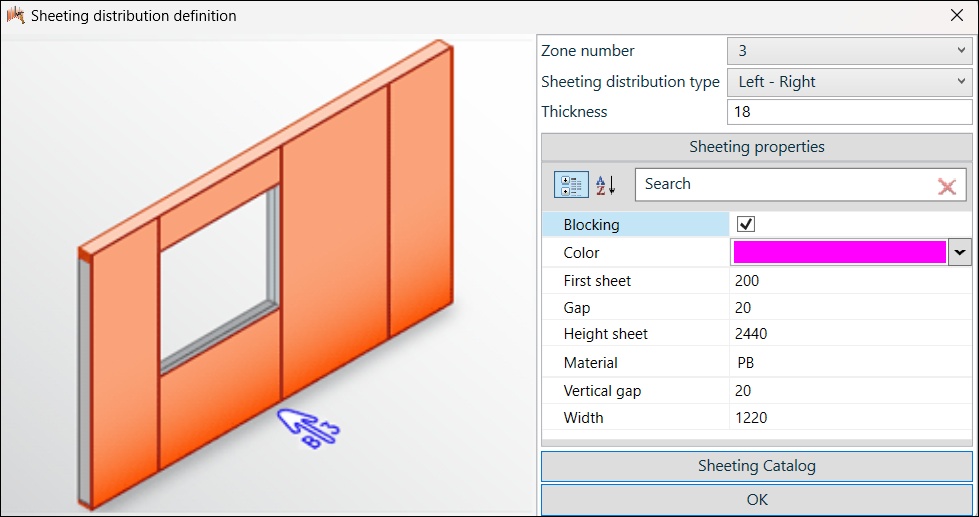
- Select the Left-Right option in the Sheeting distribution type pull down menu.
Zone number – Select the Zone you want the sheeting in.
Sheeting distribution type – Pull down menu with the different options.
Thickness – This is the thickness of the sheet which can be changed here but might result in sheets overlapping.
Blocking – Turn on this setting if you want blocking (noggins) between the sheet and the next sheet above it.
Color – Select the color that you want the sheet to appear in.
First Sheet – You can enter a width for the first sheet of the wall.
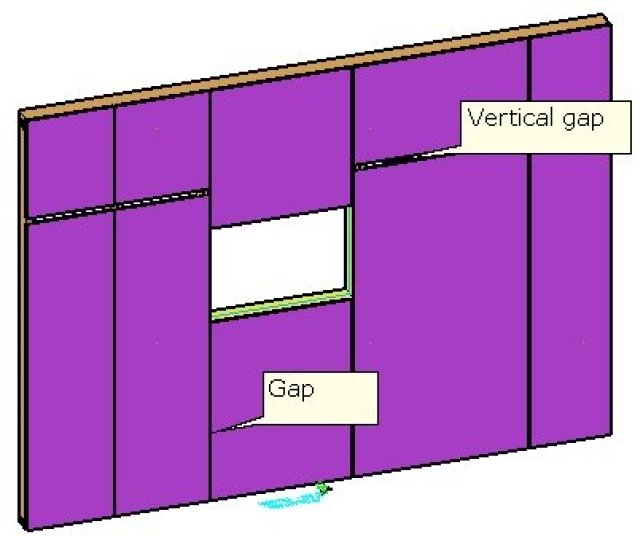
Gap – Specify the horizontal gap (distance between sheet and next sheet to the right or left).
BLOCK_WARNING_START
IMPORTANT: When using a gap, add the value onto the sheeting otherwise this will be subtracted from the sheeting. (For example: you have a sheet of 1200 and a gap of 20 your sheeting should be 1220 and enter 20 in the gap).
BLOCK__END
Height Sheet – Enter a height for the sheet
Material – Enter the name for the sheeting material.
Vertical Gap‐ Specify the vertical gap (distance between sheet and next sheet to the top).
Width – Enter the width you want the sheets to be.
You can select predefined Sheeting in the Sheeting catalog.

When using the Vert. latwerk op stijlen
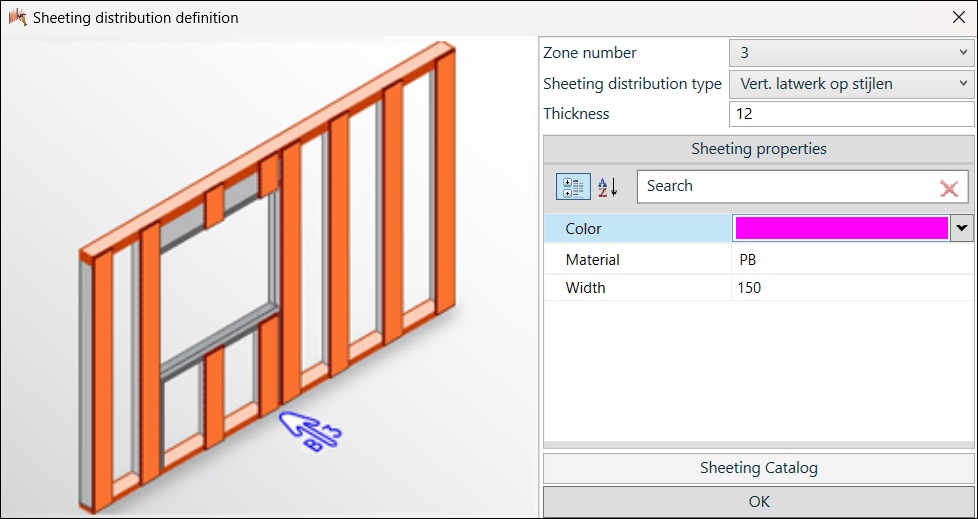
- Select the Vert. latwerk op stijlen option in the Sheeting distribution type pull down menu.
Zone number – Select the Zone you want the sheeting in.
Sheeting distribution type – Pull down menu with the different options.
Thickness – This is the thickness of the sheet which can be changed here but might result in sheets overlapping.
Color – Select the color that you want the sheet to appear in.
Material – Enter the name for the sheeting material.
Width – Enter the width you want the sheets to be.
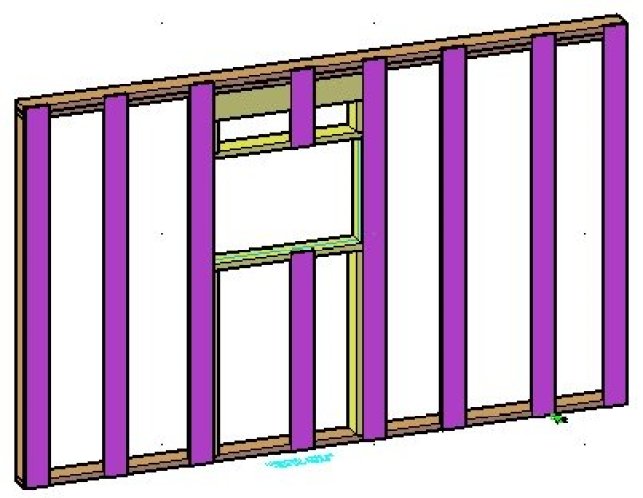
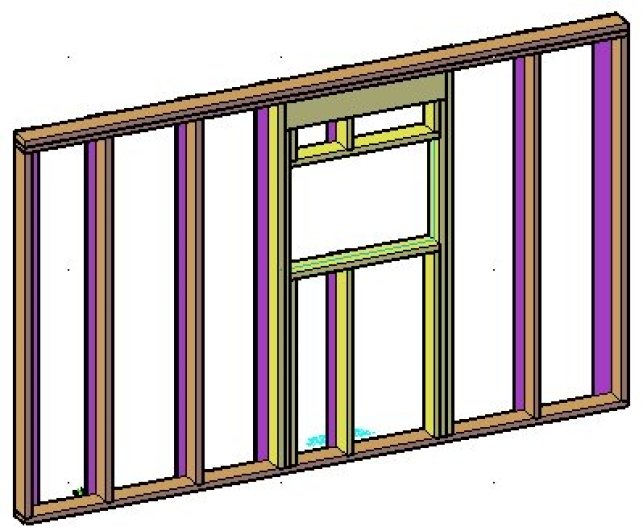
Example:Vertical front side
When using the Type 10
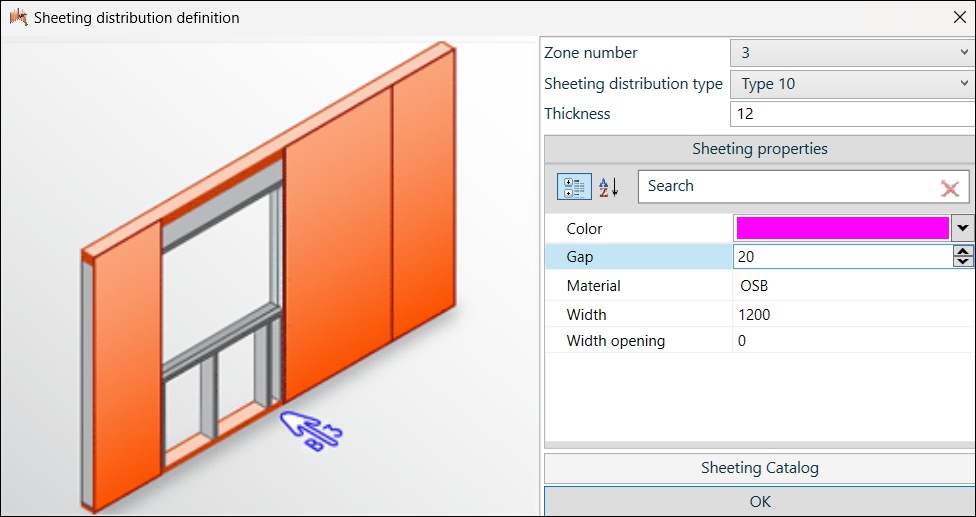
- Select the Type 10 option in the Sheeting distribution type pull down menu.
Zone number – Select the Zone you want the sheeting in.
Sheeting distribution type – Pull down menu with the different options.
Thickness – This is the thickness of the sheet which can be changed here but might result in sheets overlapping.
Color– Select the color that you want the sheet to appear in.
Gap– Specify the horizontal gap (distance between sheet and next sheet to the right or left).
Material– Enter the name for the sheeting material.
Width– Enter the width you want the sheets to be.
Width opening– Enter a value for the opening. (This will make an extra space between the window/Opening and the sheeting).
BLOCK_CHECK_START
In this case we have made a width opening of 50 and a gap of 20, the space between the sheeting and the opening is now 70mm
BLOCK__END
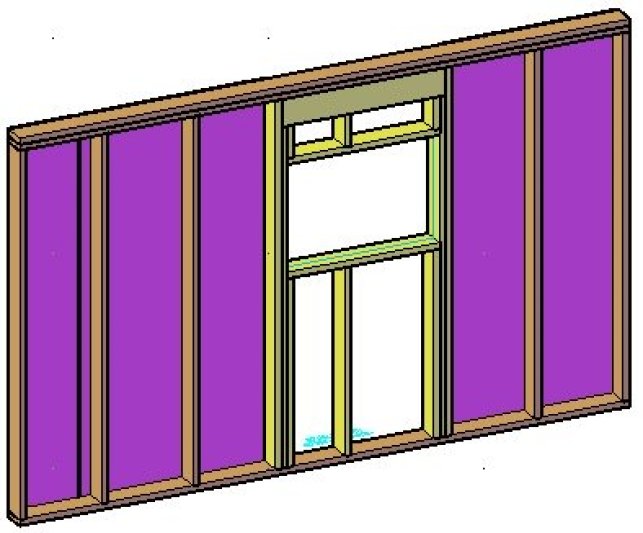
When using the Party wall
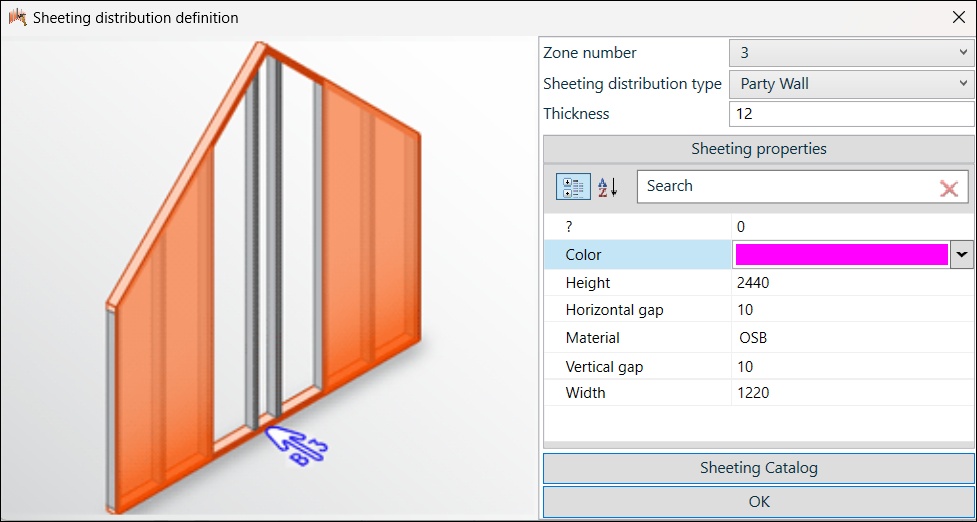
- Select the Party wall option in the Sheeting distribution type pull down menu.
Zone number – Select the Zone you want the sheeting in.
Sheeting distribution type – Pull down menu with the different options.
Thickness – This is the thickness of the sheet which can be changed here but might result in sheets overlapping.
Color – Select the color that you want the sheet to appear in.
Height – Enter a height for the sheet.
Horizontal Gap – Specify the horizontal gap (distance between sheet and next sheet to the right or left).
Material – Enter the name for the sheeting material.
Vertical gap – Specify the vertical gap.
Width – Enter the width you want the sheets to be.
You can select predefined Sheeting in the Sheeting catalog.
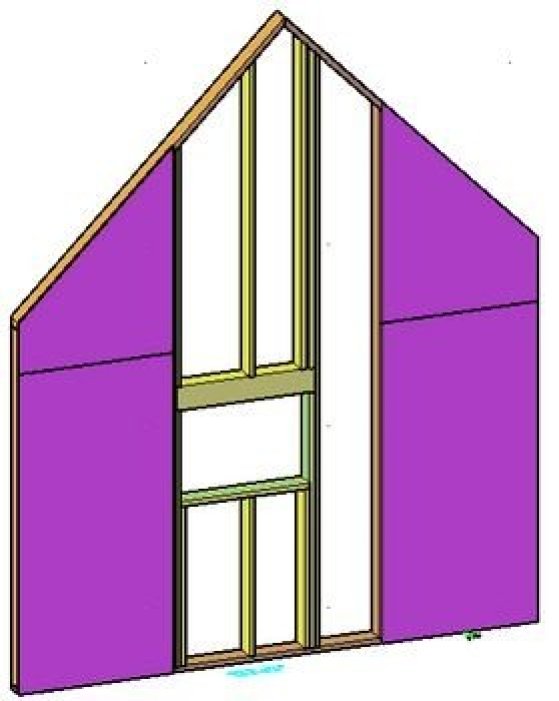
Example: Party wall front side

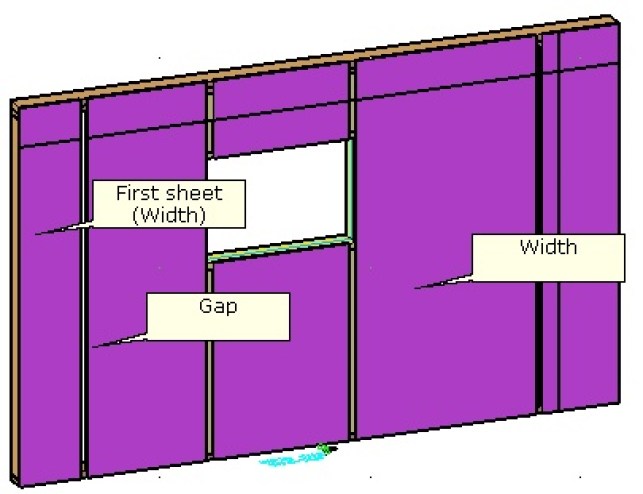
When using the Overlap at window
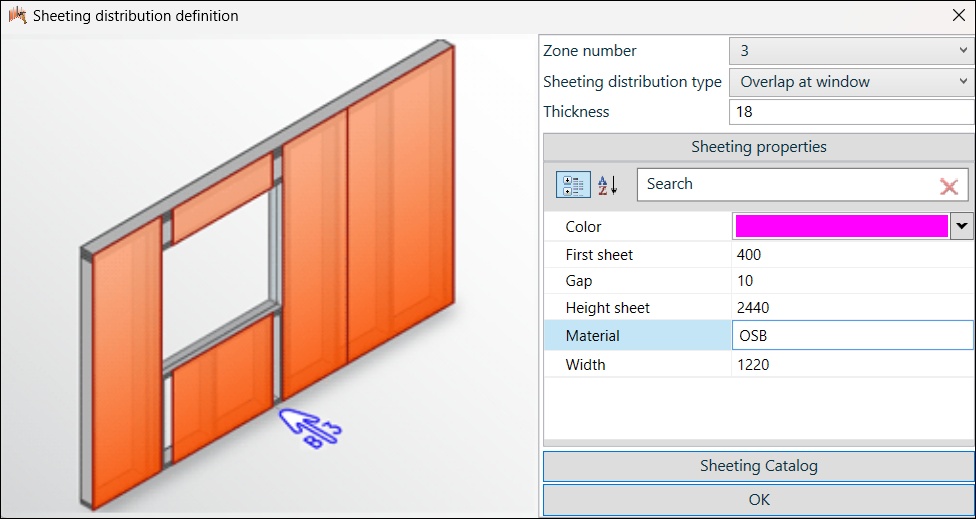
- Select the Overlap at window option in the Sheeting distribution type pull down menu.
Zone number – Select the Zone you want the sheeting in.
Sheeting distribution type – Pull down menu with the different options.
Thickness – This is the thickness of the sheet which can be changed here but might result in sheets overlapping.
Color– Select the color that you want the sheet to appear in.
First sheet– Enter a value for the First sheet.
Gap– Specify the vertical gap.
Height sheet– Enter a height for the sheet.
Material– Enter the name for the sheeting material.
Width– Enter the width you want the sheets to be.
You can select predefined Sheeting in the Sheeting catalog.

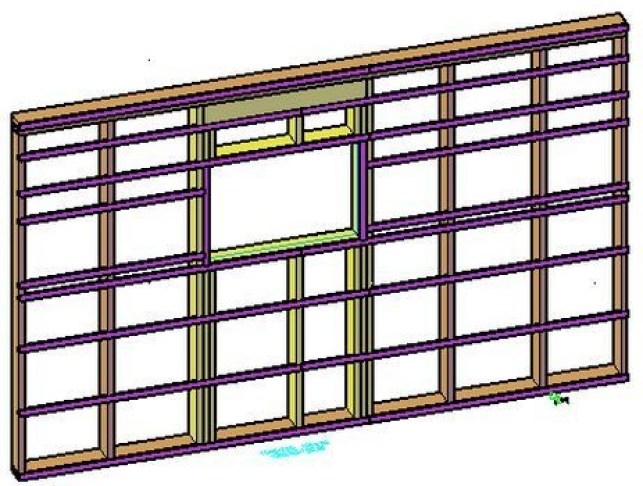
When using the Horizontal lath
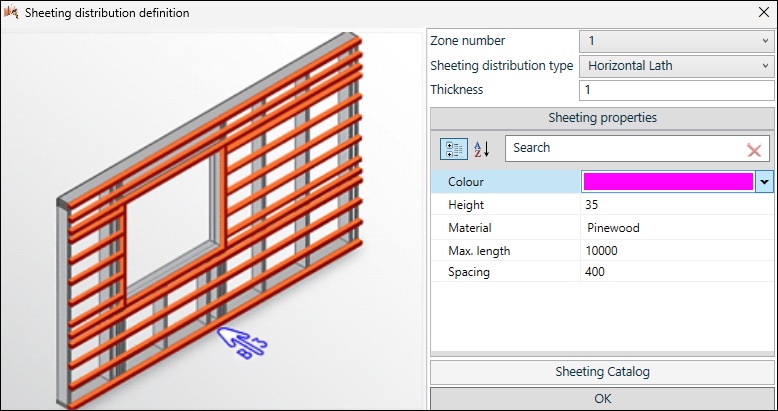
- Select the Horizontal lath option in the Sheeting distribution type pull down menu.
Zone number – Select the Zone you want the sheeting in.
Sheeting distribution type – Pull down menu with the different options.
Thickness – This is the thickness of the sheet which can be changed here but might result in sheets overlapping.
Color – Select the color that you want the sheet to appear in.
Height – Enter a height for the sheet (Lath)
Material – Enter the name for the sheeting material.
Max. Length – Enter a value for the max.Length of a Lath.
Module – Enter a value for the spacing (Center‐Center of the Laths)
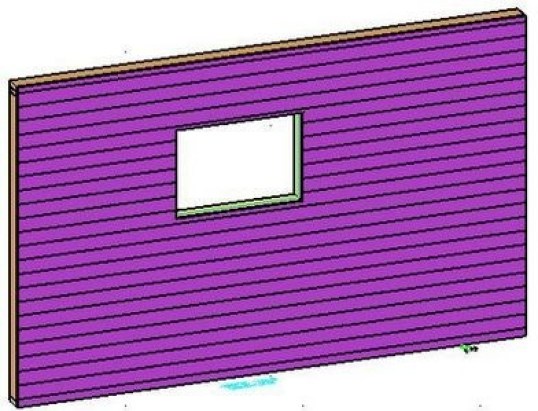
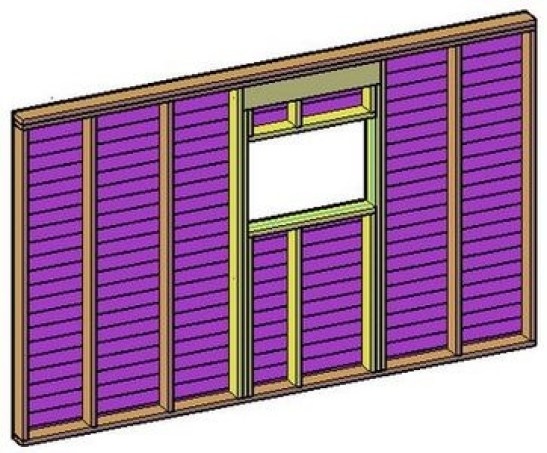
When using Log Siding
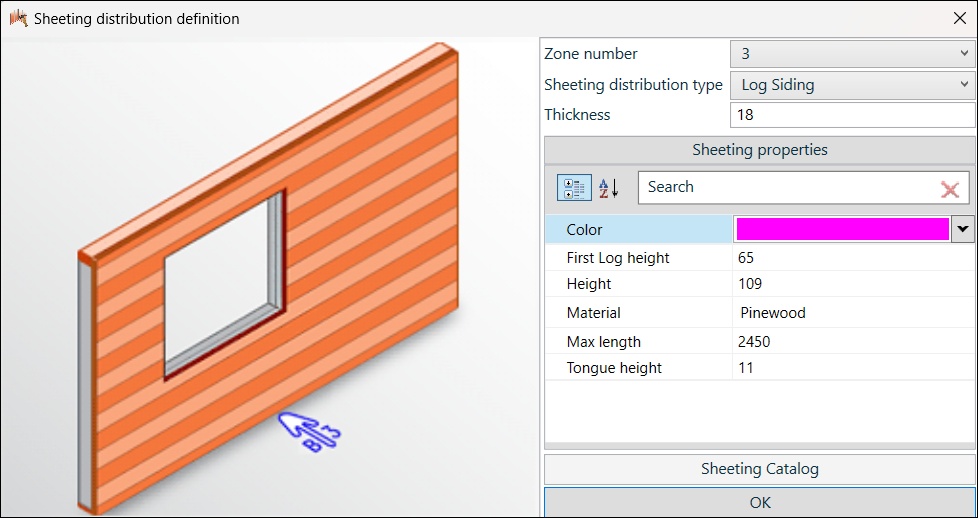
- Select the Log Siding option in the Sheeting distribution type pull down menu.
Zone number – Select the Zone you want the sheeting in.
Sheeting distribution type – Pull down menu with the different options.
Thickness – This is the thickness of the sheet which can be changed here but might result in sheets overlapping.
Color – Select the color that you want the sheet to appear in.
First log height – Enter a value for the first log height.
Height – Enter a height for the sheet.
Material – Enter the name for the sheeting material.
Max. Length – Enter a value for the max. Length of a log.
Tongue height – Enter a value for the Tongue height.
If you want to return to the original document
How to make hsbWall details – Wall Detail Builder hsbDesign22/23/24/25/26