How to install hsbDesign24 for AutoCAD®Architecture (Video)
This article will guide you through the setup and installation of hsbDesign24 for AutoCAD® Architecture.
Prior to installation please note that
hsbDesign23 is only compatible with AutoCAD® Architecture 2019, 2020, 2021, 2022
hsbDesign24 is only compatible with AutoCAD® Architecture 2021, 2022
Please ensure that you have installed one of these versions of AutoCAD® Architecture.
hsbDesign24 only works on a Windows10 or 11
Does not work with AutoCAD® only AutoCAD® Architecture
Step 1: Download hsbDesign24 for AutoCAD® Architecture Setup File
Before you can download the setup file you will need to create an account at www.myhsbcad.com.
After you have created your Myhsbcad.com credentials, you can download the hsbDesign24 setup file in Myhsbcad downloads.
Step 2: Start the Installation
Once you have downloaded the setup file, open it, and your installation will begin. You will see the dialog box that confirms the extraction of the installation files.
Step 3: Setup Options & Software License and Service Agreement
After the extraction is complete, this will open the following dialog box: Setup Options & Software License and Services Agreement.
You will need to make a few choices prior to the setup and installation, which are as listed below.
- Region: You will need to pick your region. This will load the necessary content.
All users will receive the General Content as default.
- Language: You will need to select your language.
- Installation Path: The hsbDesign24 installation has a default location path, shown in the image below.
You have the option to change this file path location.
AutoCAD®Architecture (Global) or AutoCAD®Architecture US Metric
- ACA 2022: Select AutoCAD® Architecture (Global) or AutoCAD® Architecture (US Metric)
The idea behind the two different profiles is one (US Metric) is meant to be soft metric and the other (Global) is meant to be true metric.
You will see differences in sizes available for things like pipe, conduit, etc.
For example, for conduit you might see 10, 12, 16, 20, 25, 32 for sizes in Global but in US Metric you might see 16, 21, 27, 35, 41, etc.
Basically more like imperial sizes shown in metric units.
If you want real metric, you should use Global.
- Install hsbCompany Folder: This will install the hsbCompany Standard folder in your C:\ Drive. This option is checked by default and you have the option to specify an alternative file path location.
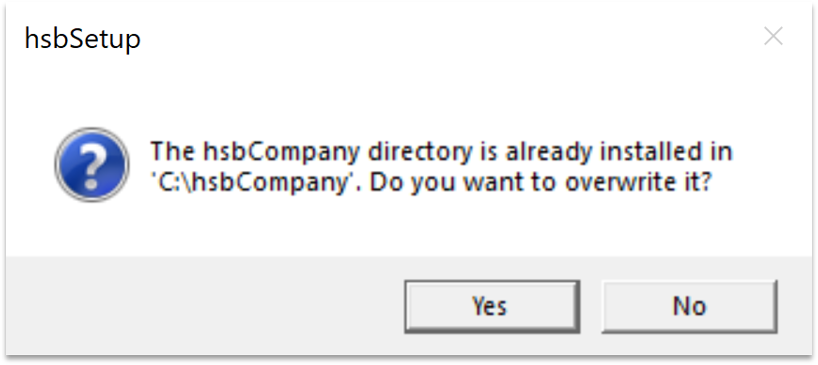
If hsbDesign24 detects an existing hsbCompany folder in your C:\ drive the following dialog box will appear.
You can choose to overwrite by clicking yes, or click no which will continue the installation process without changing the existing hsbCompany folder.
- Accepting the Software License and Services Agreement: Once you have chosen all the options for your setup you can then accept the terms and conditions laid out in the Software License and Services Agreement.
You do have the option to print or save these terms and conditions if you choose too as shown below.
Once the installation is complete this will open the following dialog box to let you know that the installation was successful as shown below.
Step 4: Starting hsbDesign24 Software
On your desktop, an hsbDesign24 shortcut will be installed. (See Image Below)
Double click this icon to start your hsbDesign24 software.
Step 5: Logging in to hsbDesign24
When you first launch hsbDesign24 the following dialog box will appear which will start the login process.
Once you have selected Login a dialog box will open.
This is where you will enter your credentials.
Once you have logged into your software you will not have to login again until you have either logged out, using the license manager (see step 6 below) or need to reset your license.
Should you require to login at a different location and find that you are still logged in elsewhere, then the following dialog box will open.
This will allow you to reset the license and allow you to use hsbDesign24 at the new location.
Step 6: How to manage your license in hsbDesign24 after you have logged in.
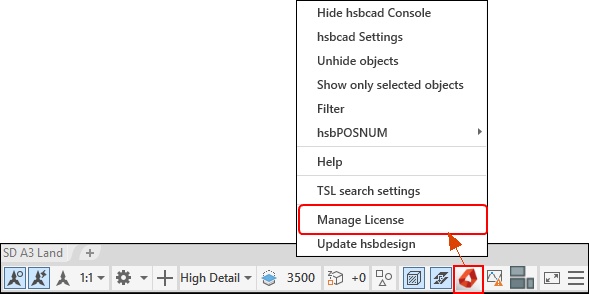
After you have logged in and you would like to manage your license. You can then click on the hsbcad icon in the lower right-hand corner of the window. The hsbcad icon can be found in the Status Bar of AutoCAD® Architecture. This will then open the following dialog box and you will then click the ‘Manage License’ option.
After you selected the Manage License option, the following dialog box will appear giving you your license information, which will include your license connection status, list of modules, user information, and hardware information.
What's new in hsbDesign24 Video's
All the New Features see this link


