Log Wizard
This document is about how to use the log shed wizard.
Before you can start the shed wizard, you will need to define custom log profiles that suit your method of construction. (See Log homes Tutorial).
The Shed Wizard is an automatic way of building a Log home really quick.
Run the command hsbLog\Shed Wizard or select the following icon on the toolbar.


Log Wall Tab
Wall Type

Log wall -
Stick Frame wall -
- Select the Log Wall Tab.
BLOCK_CHECK_START
Before you can use this command you need to have defined at least 1 Wall and defined a corner connection (see Log homes Tutorial).
BLOCK__END
- Select a Log wall in the Log wall definition pull down and a notch in the Notch tool (from tool Catalog) pull down
- Choose one of the 2 radio buttons to set Height of the first half log.
Supporting Walls

X Direction walls start half log - Select X Direction if you want the half log to be in this direction.
Y Direction walls start half log - Select Y Direction if you want the half log to be in this direction.
Height of first log - Enter the height of the log, enter a fraction (1/2) or a value in mm/inches (depending on what units Width and Length options).
Width and length options

Width (A*) - Enter the Width of the wall between the wall connections.
Length (B*) - Enter the Length of the wall between the wall connections Walls not included Walls included (*).
- Select one of the 2 radio buttons (so one of the above can take place).
Walls not included or Walls included (*)
Wall Overhangs
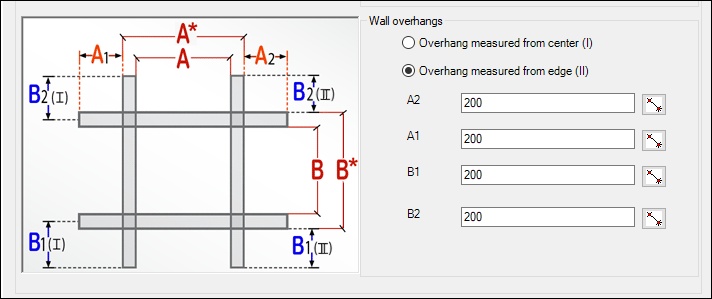
Overhang measured from center (I) - Select this option if you want the overhang from the center to the end of the log.
Overhang measured from edge (II) - Select this option if you want the overhang from the outer edge to the end of the log.
A2 – Enter the wall overhang
A1 – Enter the wall overhang
B1 – Enter the wall overhang
B2 – Enter the wall overhang
- Select one of the 2 radio buttons (so one of the above can take place).
Overhang measured from center (I) or
Overhang measured from edge (II)
Catalogs

After you have entered all the information, you can store this in the catalog by pressing Add, fill in an appropriate name and press Accept.
If you want to remove an entry select the Remove button, select the entry you want to remove and select the Remove button. This will remove the entry.
To load a predefined Entry press the arrow on the right side of the box on the bottom right side of the dialog box and select the Entry you want.
Supporting walls
Front wall - Back Wall - Left Wall - Right Wall.
Select one of the 4 buttons of the Supporting walls.
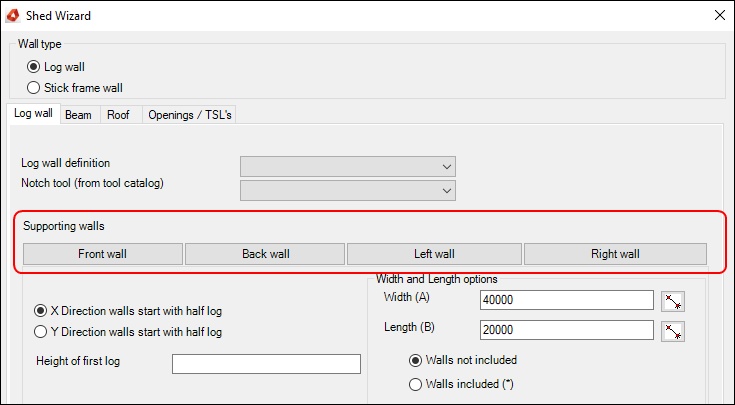
You will get the following dialog box.
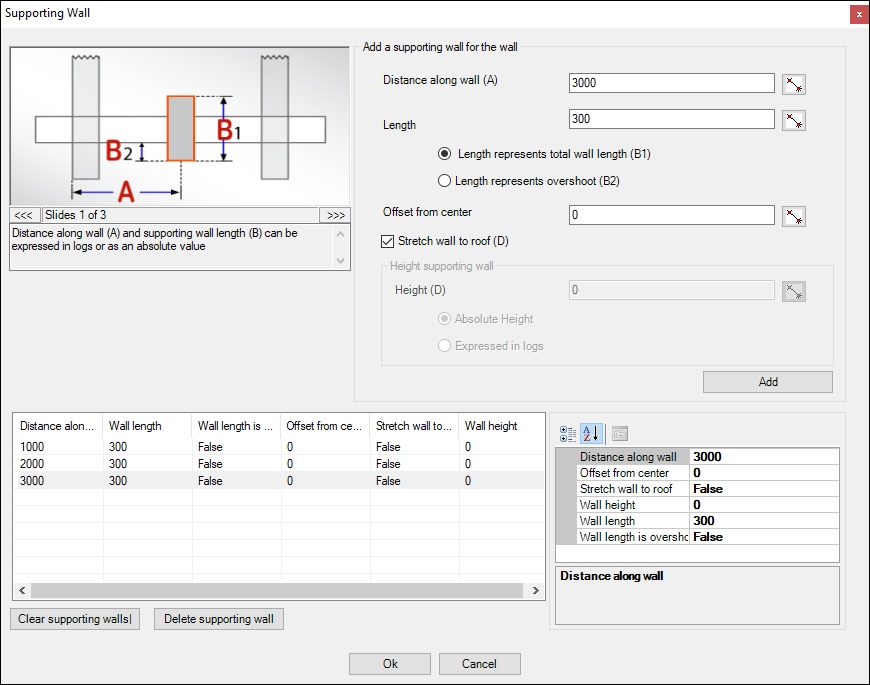
Add a supporting wall for the wall
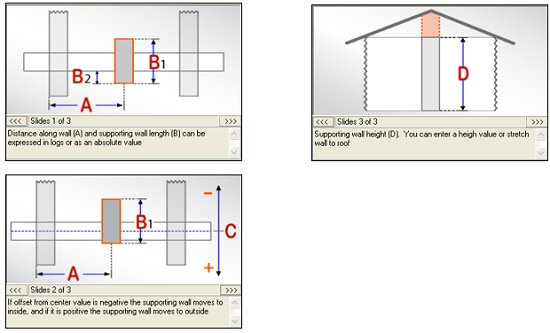
Distance along wall (A) - Enter the distance between the outer edge of the wall and the center of the supporting wall.
Length - Enter the length of the supporting wall. (this entry depends on the selected button (B1-B2)).
Select one of the 2 radio buttons (so the Length of the above can take place).
Length represents total wall length (B1) - Enter the length of the supporting wall.
or
Length represents overschoot (B2) - Enter the distance between the outer wall and the end of the supporting wall.
Offset from center - Enter the value you want the beam to be out of center of the wall from.
Stretch wall to roof (D) - Select this and the wall will be stretched to the roof plane. When you select this option, the info below will be switched off.
Height supporting wall
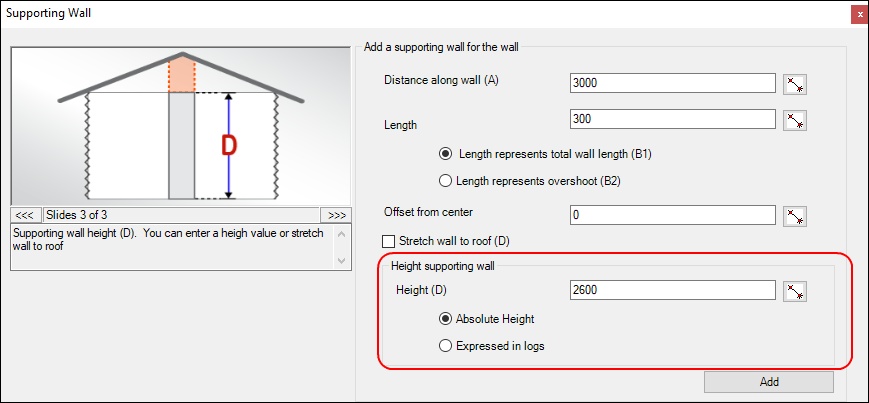
When Stretch wall to roof (D) is not selected then you can fill in these values.
Height (D) - Enter a value if you choose ‘Absolute height.
- Enter a number of logs if you choose Expressed in logs.
- Select one of the 2 radio buttons (so the above can take place).
Absolute Height - The absolute height of the walls.
Expressed In logs - The height expressed in the amount of logs.
BLOCK_ALERT_START
Don’t forget to select the ADD button if you want to save all the settings.
Add – When this is selected the information that has been filled in will appear in the list.
BLOCK__END
Add
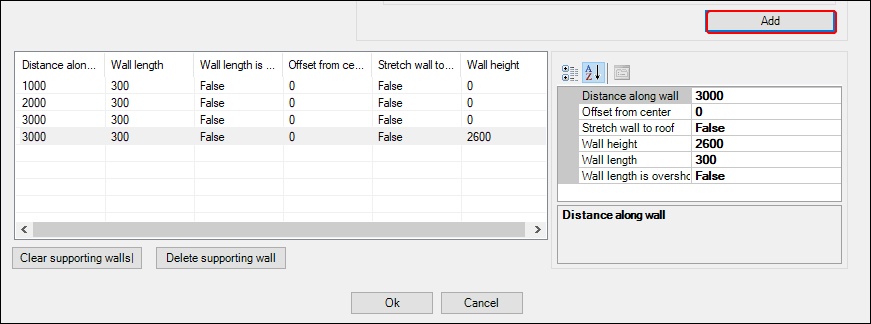
Add – When this is selected the information that has been filled in will appear in the list.
Changes can be made in this list, when you select something under Misc you can change the information.
Clear supporting walls - Select this if you want to clear the list.
Delete supporting wall - Select this if you want to delete 1 specific line in this list.
Repeat these actions for the Back wall/Left Wall and Right wall.
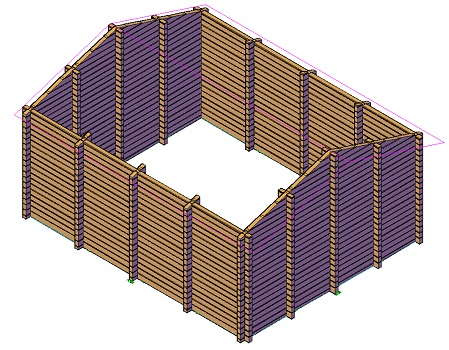
Example of a wall with supporting walls as shown in the dialog box’s Supporting Wall above.
Beam Tab
Next dialog box are the settings for the beams in the roof.
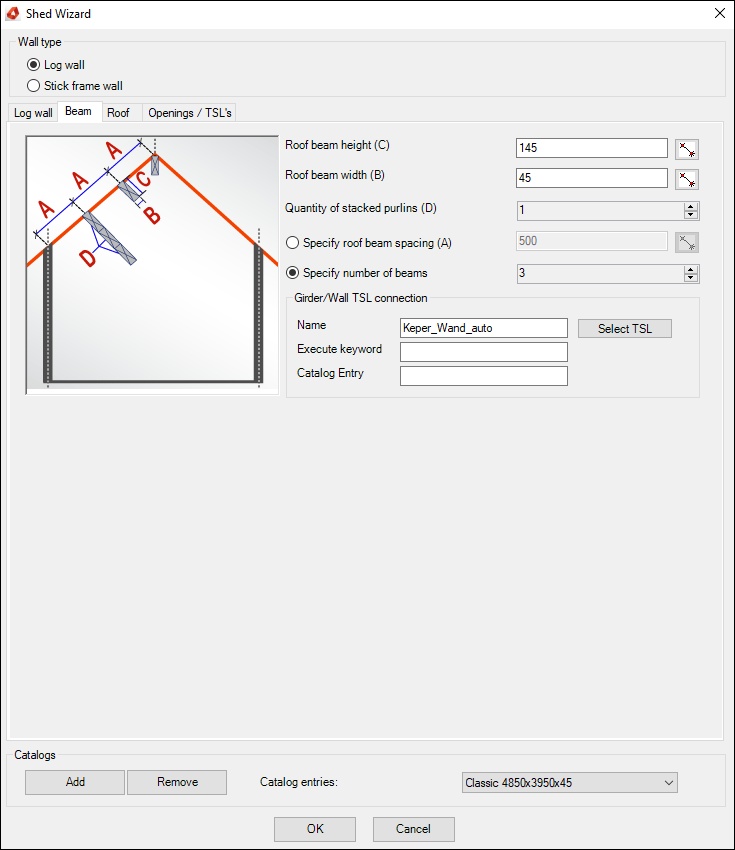
Roof beam height (C) - Enter the height of the beam.
Roof beam width (B) - Enter the width of the beam.
Quantity of stacked purlins (D) - Enter the amount of beams you want to have.
- Select one of the 2 radio buttons.
Roof beam height (C) - Enter the height of the beam.
Roof beam width (B) - Enter the width of the beam.
Quantity of stacked purlins (D) - Enter the amount of beams you want to have.
- Select one of the 2 radio buttons.
Specify roof beam spacing (A) - Enter the spacing between the beams.
Specify number of beams - Enter the spacing between the beams.
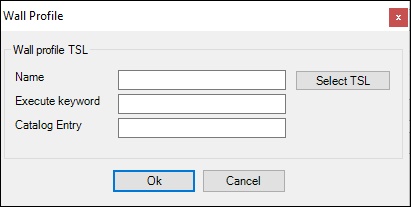
Girder/Wall TSL connection
Name – ….
Execute Keyword - ….
Catalog Entry - …..
Catalogs

After you have entered all the information, you can store this in the catalog by pressing Add, fill in an appropriate name and press Accept.
If you want to remove an entry select the Remove button, select the entry you want to remove and select the Remove button. This will remove the entry.
To load a predefined Entry press the arrow on the right side of the box on the bottom right side of the dialog box and select the Entry you want.
Roof Tab
Next dialog box are the settings for the roof.
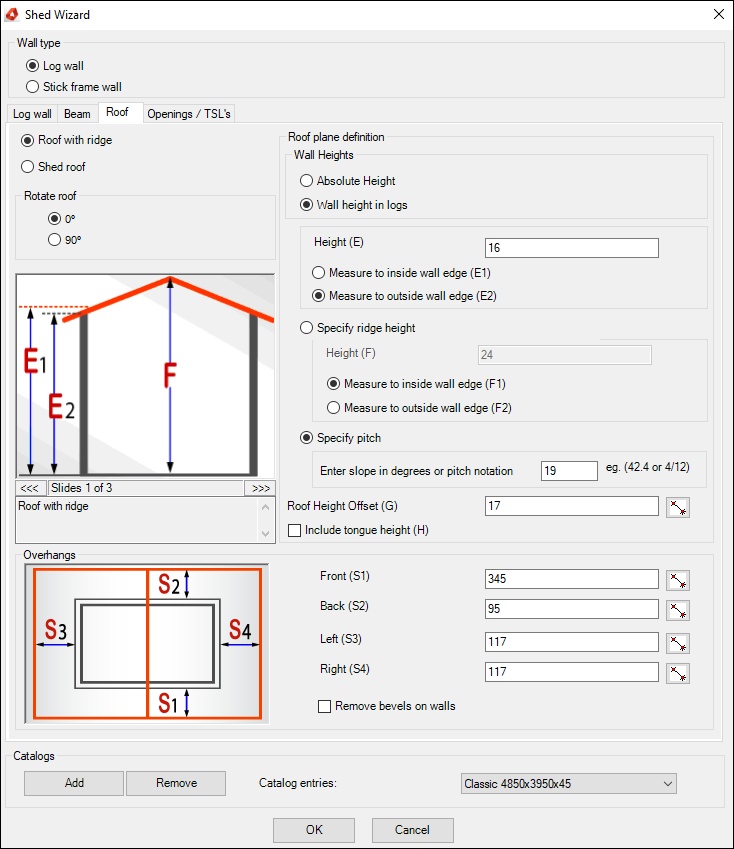
- First of all select one of the 2 radio buttons.
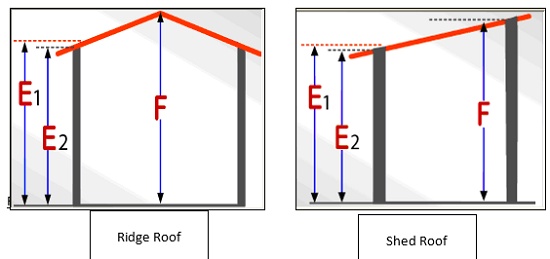
Roof with ridge - Roof with a Ridge.
Shed Roof - Roof with one sloping side.
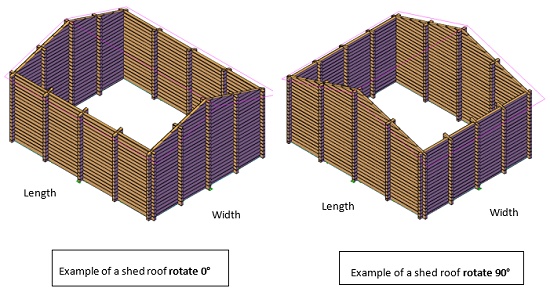
Rotate Roof
- Select one of the 2 radio buttons.
0° - Example 1
90° - Example 2
Roof plane definition
Wall Height:
Absolute Height - The absolute height of the walls.
Wall height In logs - The height expressed in the amount of logs.
Height (E) - Enter the height of the Roof plane.
- Select one of the 2 radio buttons (so the above can take place).
Measure to inside wall edged (E1) - Select this if you want the roof plane to go to the inside of the wall edge.
Measure to outside wall edged (E2) - Select this if you want the roof plane to go to the outside of the wall edge.
- Select one of the 2 radio buttons.
Specify ridge height - Height (F) - Enter the height of the ridge.
Measure to inside wall edged (F1) - Select this if you want the roof plane to go to the inside of the wall edge.
Measure to outside wall edged (F2) - Select this if you want the roof plane to go to the outside of the wall edge.
Specify pitch - Enter the slope in degrees or pitch notation.
Overhangs

Front (S1) - Enter a value for the overhang on the front side.
Back (S2) - Enter a value for the overhang on the back side.
Left (S3) - Enter a value for the overhang on the left side.
Right (S4) - Enter a value for the overhang on the right side.
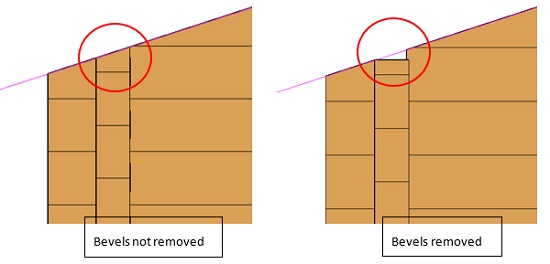
Remove bevels on walls - Select this if you want the bevels to be removed.
Catalogs

After you have entered all the information, you can store this in the catalog by pressing Add, fill in an appropriate name and press Accept.
If you want to remove an entry select the Remove button, select the entry you want to remove and select the Remove button. This will remove the entry.
To load a predefined Entry press the arrow on the right side of the box on the bottom right side of the dialog box and select the Entry you want.
Opening TSL Tab
Next dialog box are the settings for the openings and TSL’s.
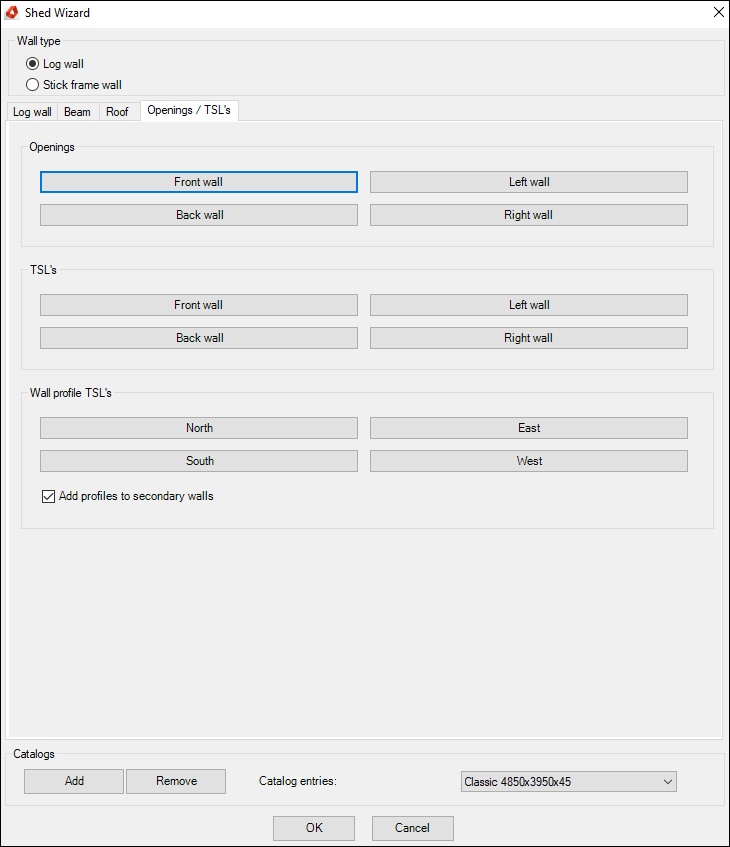
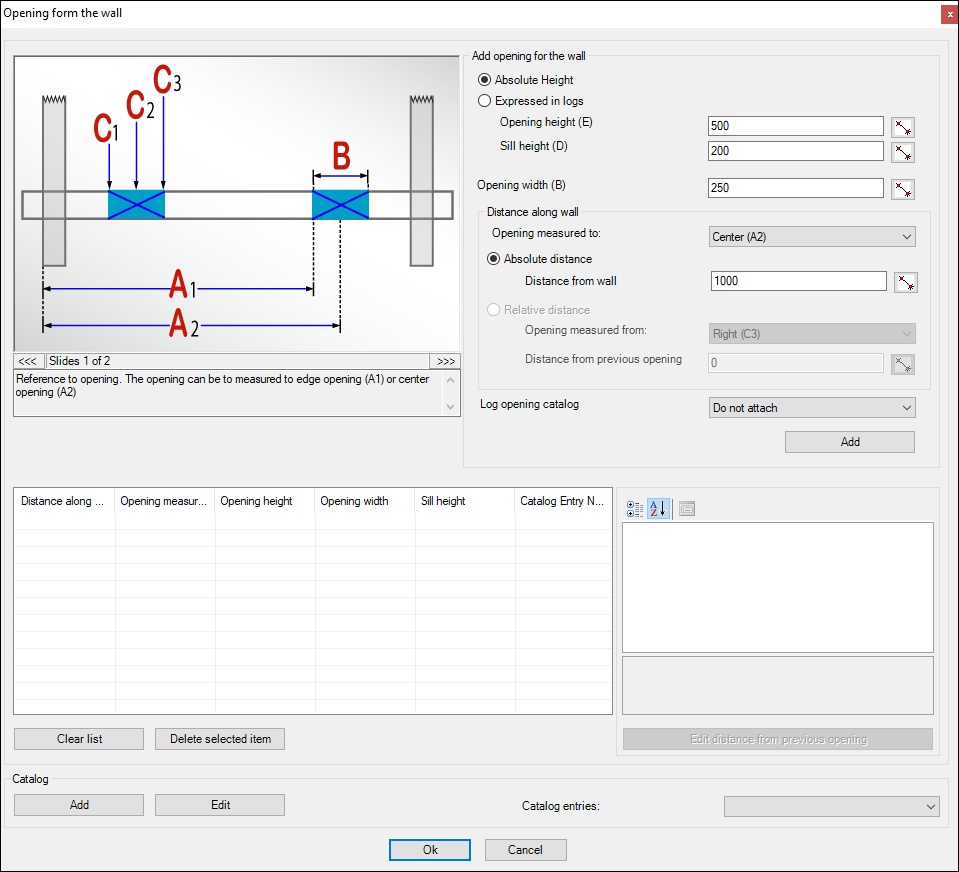
Openings
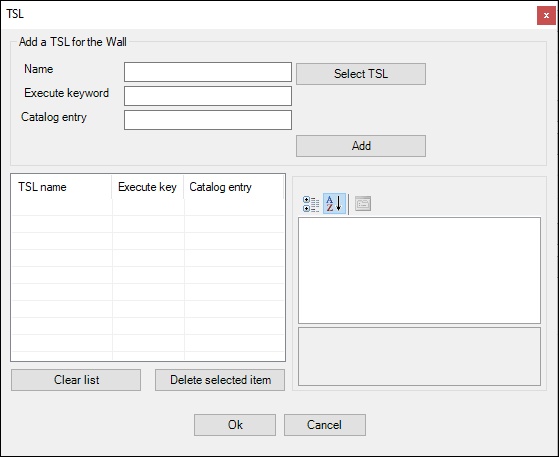
TSL's
Wall profile TSL's
