Essential Guide to Add numbering - Apply Numbers (video)
What entities get a number?
In hsbcad, the following entities will be given a number:
- Timbers
- Sheetings
- Panels
- MetalParts
- Mass Groups
- Plot Viewports
Why do you need to apply number
You apply numbering so that hsb creates identical numbers for each of the objects that are identical and they can then be easily identified in the manufacturing drawings and in the hsb database. If a number on a timber is different to another timber, then there is some difference in the size of the two timbers.
Prepare for numbering
Before you start numbering make sure that what you’re numbering has construction generated and is visible on screen. I.e. if you are numbering timbers on walls, all the walls should be visible and numbered together, otherwise you could end up with two identical timbers with different numbers.
How to Apply numbering
To apply numbering select hsbInOutput\Apply Numbering. On the Apply Numbering dialog you can select the following information.
Numbering settings
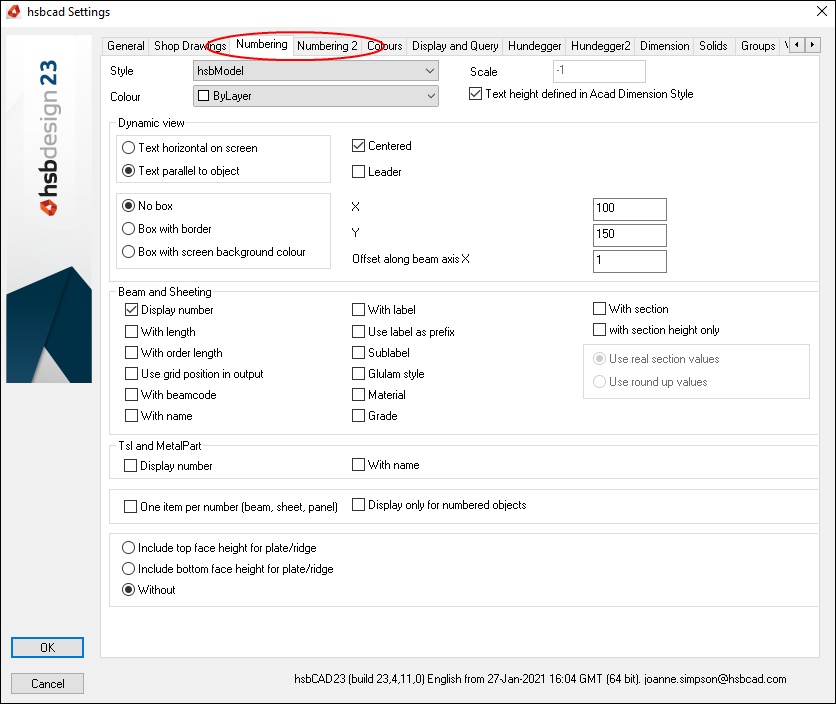
The display of the numbering is controlled in the hsbGeneral\hsbSettings dialog box in both the Numbering tab and Numbering 2 tab.
Numbering tab
Stores the settings for the component numbers of Beams and Sheets.
To specify the text height, either select a dimension style from the Style list and control the text height through the selected dimension style.
If using an AutoCAD dimension style to control the text, then make sure to check the setting Text Height Controlled by AutoCAD Dimension Style.
Alternatively uncheck the setting Text Height Controlled by AutoCAD Dimension Style and enter a value for the text height, usually a value between 20 and 25.
Select a color to be used for the numbering text. This is the only place to control the text color i.e. text color cannot be controlled from the selected dimension style.
Dynamic View:
This area allows you to define some additional display variants of the entity numbers. This allows the entities to be numbered with or without a box, or the entity number can be displayed in the middle of the object.
How to number your project with a Leader (Video)
This will also show you the meaning of Restore default tag location
Beam and Sheeting
In addition to the entity number, additional information can be displayed on entities. If you have enabled more information in this area, it will be displayed from the properties of the entity.
TSL and metal parts
For these objects, you can display the number and name of the object.
BLOCK_CHECK_START
For more information - Among other things, you can set a separate entity number for each entity (same entity usually gets the same number), or whether the absolute height of the top/bottom edge should be displayed on your purlin.
BLOCK__END
Numbering 2 Tab
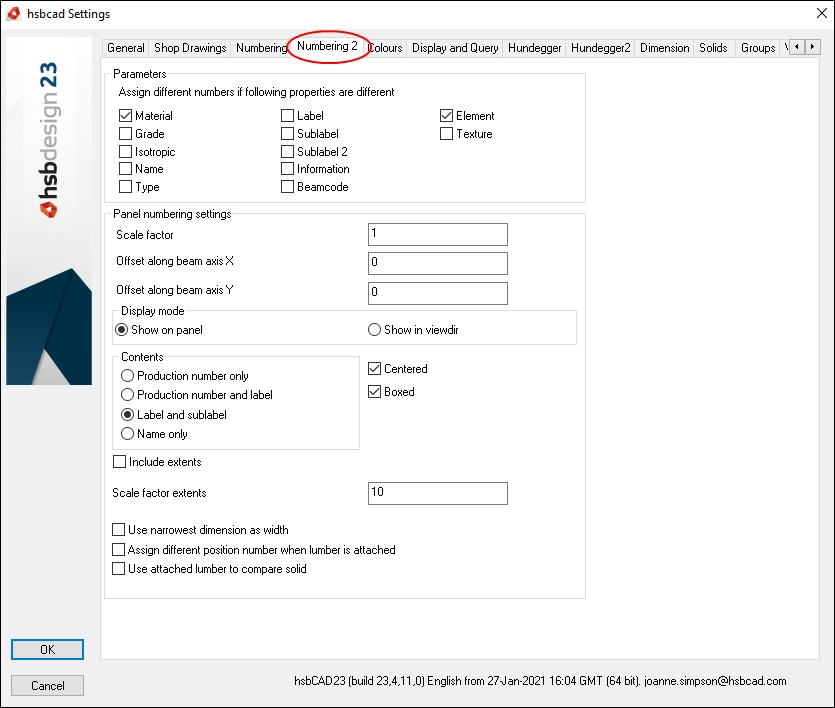
The settings for the component numbers of panel are stored and parameters for distinguishing entities are set.
Parameters
This option is valid for all entities. Information is stored here, should an entity be ant different to another entity it will get a different number. If two identical objects differ in one way or another, you will get a different number.
Panel numbering settings
In the case of panels (board plywood panels), as with "staff and plate", some settings for the component number can be made. e.B. size, location, with or without frame, additional information, etc.
Apply numbering
In the hsbInOutput pulldown menu you will find the Apply numbering.
In the dialog box, that appears you can make further settings:
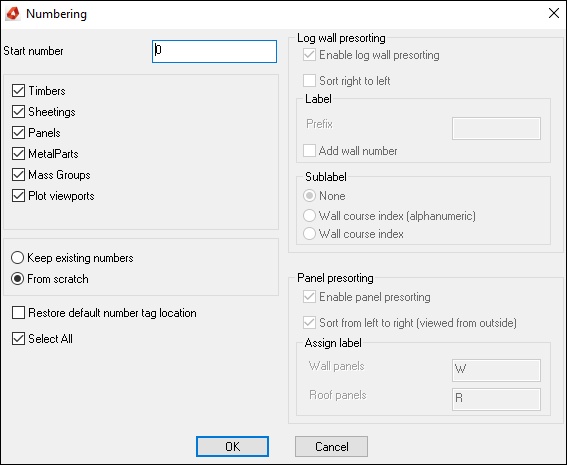
- Start Number - Enter the number that you want the first timber found to receive. Each unique timber found will get a unique number, each number incremented by 1. Any two timbers that are identical will receive the same number
- What to Number - Select the type of object that you want to number – Timber, MetalParts, Panels, Sheeting’s.
- Keep Existing Number - Select if you want to Keep Existing Number or start numbering From Scratch. Normally you will select to start From Scratch.
- Restore Default Tag Location - Select to Restore Default Tag Location if you want any numbers that you have moved to be displayed at their default location (such as center of beam).
- Select all - All of the components activated above are numbered equally without the need for manual selection.
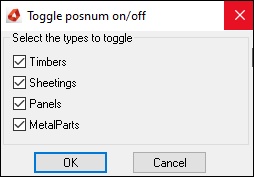
Toggle numbers on/off
In the pull down menu hsbInOutput select the command Toggle Numbering on/off.
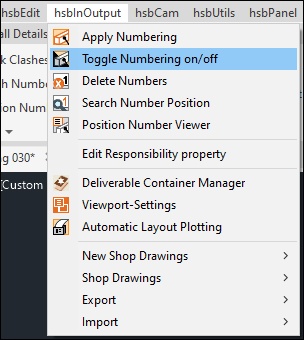
Turn on/off the entities you want/don't want to see.
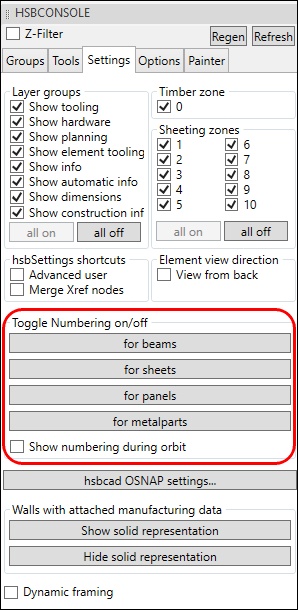
hsbconsole
In the hsbconsole you will find the possibility to switch on/off the entity numbers in the Settings tab
Delete Numbers
You can also delete part numbers from the hsbInOutput menu. Go to the command and then select the parts from which you want to delete the numbers. Confirm with Enter.
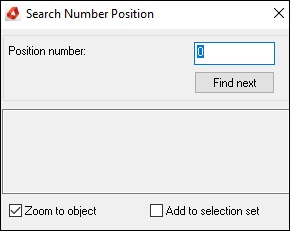
Search position number
Under hsbInOutput there is the command Find position number
- Enter the number you want to search for. If you enter 0, you will see all parts without a position number.
- Zoom to the object: search for a number and have this opiton active, the screen is automatically zoomed towards that object.
- Add to selection: Enable this option, in addition to already activated objects, the parts with the number you are looking for are selected and you can change these edit or properties.
Assign the same part number to the part
If you have two bodies that are identical, but due to a small deviation (e.B of a different property) have got different part numbers, you can compare bodies using hsb_Checkconstruction. In the dialog box that opens, you can set both parts to receive the same number.
Layout
Do you have a layout that displays all part numbers even though you only want to show some? For this purpose, you can create a list of the parts from which the numbers are to be displayed in the context menu of the artboard.
To set the list, you must be in the desired layout viewport.
Create a new list - Select the objects from which you want to see the number and confirm with Enter. All other parts now hide the numbers.
Deleting the list - If the selection is deleted, all numbers will be displayed again.
Remove or add to display - You can add or remove parts from the current list.

