How to generate (frame) elements
What construction needs to be generated/deleted
You will use this hsb tools to generate or delete the construction of walls, floor and roof panels. You can generate a selection of objects or a group of objects. When you generate elements, it is very important to remember that you generate your elements on a group by group basis. To do it any other way would use up too many resources on your PC. Therefore the first step to generating elements is to make the generating group current.
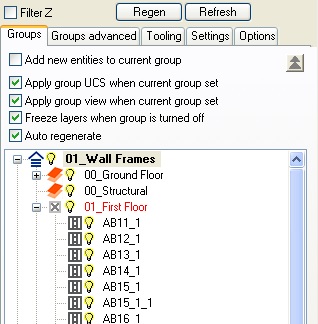
Setting groups current
There are 3 levels of groups:
- House Level.
- Floor Level.
- Element Level.
To set a group current, left-click on the corresponding levels icon in the hsbConsole.

What happens when I generate/delete construction
The process involved here is very simple. During the generation process, hsbcad is checking the Wall type and its connecting Wall types, openings and specials. Then it is referencing these back into the detail rules that you have set in hsbDetail and hence it is creating your frames based upon your rule structure.
Generate construction
When you want to generate construction you will have to have the hsbConsole visible with a group current in the console at the floor level or element level.
To set a group current, left click on the group symbol. Now that there is a group current in the console, you have two ways in which you can generate construction.
You will have these options when you use the Generate Construction command.
- A selection of elements.
All elements on the current group.
Generate a selection of elements
To generate construction on a selection of elements,
- Select the drop-down menu hsbGeneral\Elements\Generate Construction. When prompted to select objects you can use any of the autocad selection methods (crossing, window, all...) to select the objects to be generated. Press enter when you have finished your selection and the elements that you have selected will be generated.
Generate all elements on the current group
To generate construction of all the elements of a particular group, make the group current at the floor level and select ‘hsbGeneral\Elements\Generate Construction’.
When prompted to select objects press enter twice and all the objects on the current group will be generated. Even if you set a group current at the element level and generate construction on the current group, the construction is generated at the floor level that the current element belongs to.
BLOCK_INFO_START
When prompted to select objects and you press enter once, you get the option to "select other interfering elements". This option will allow you to select other walls that connect to the walls on the current group so that these walls will be generated too and you can see the connection details.
BLOCK__END
Delete construction
When you want to delete construction you do not need a group to be current unless you are using the second method discussed here (all elements on the current group).
Again there are two ways in which you can delete construction. You will have these options when you use the Delete Construction command.
- A selection of elements.
All elements on the current group.
Delete a selection of elements
To delete construction on a selection of elements,
Step 1. Select the drop-down menu hsbGeneral\Elements\Delete Construction.
Step 2. When prompted to select objects you can use any of the Autocad selection methods (crossing,window,all...) to select the objects to be deleted.
Step 3. Press enter when you are finished your selection and the elements that you have selected will be generated.
Delete all elements on the current group
To delete construction of all the elements of a particular group:
Step 1. Make the group current at the floor level.
Step 2. Select hsbGeneral\Elements\Delete Construction.
Step 3. When prompted to select objects press enter once and all the objects on the current group will be deleted.
Locking/unlocking elements

Using any of the methods discussed here, your elements will be generated using information from your current detail library.
This will mean that you lose changes made to the timbers in your elements if they differ from your detail library.
You can overcome the re-generation of your changes by locking an element. If you lock an element it means that the element will no longer have the construction generated on it, even when you select it to be generated.
Lock an element
To lock an element, run the command ‘hsbGeneral\Elements\lock Elements’ or select the following icon on the toolbar. When prompted to select objects, again you can use all of the Autocad selection methods (crossing,window,all...) or press enter to select and lock all of the elements on the current group. You can also lock an element by selecting it and right clicking to select Element Lock from the menu. When you lock an element, the elements arrow will turn red if the element is a wall. Or if the element is a floor/roof element, then the entire element will turn red.
Unlock an element
To unlock an element, run the command ‘hsbGeneral\Elements\unlock Elements’ or select the following icon on the toolbar.
When prompted to select objects, again you can use all of the Autocad selection methods (crossing,window,all...) or
press enter to select and unlock all of the elements on the current group. You can also unlock an element by selecting it and right
clicking to select Element Unlock from the menu.

