Create Wall type in hsbcad 2017
Explanation of the dialog box in the document How to make hsbWall Details in hsbcad 2017
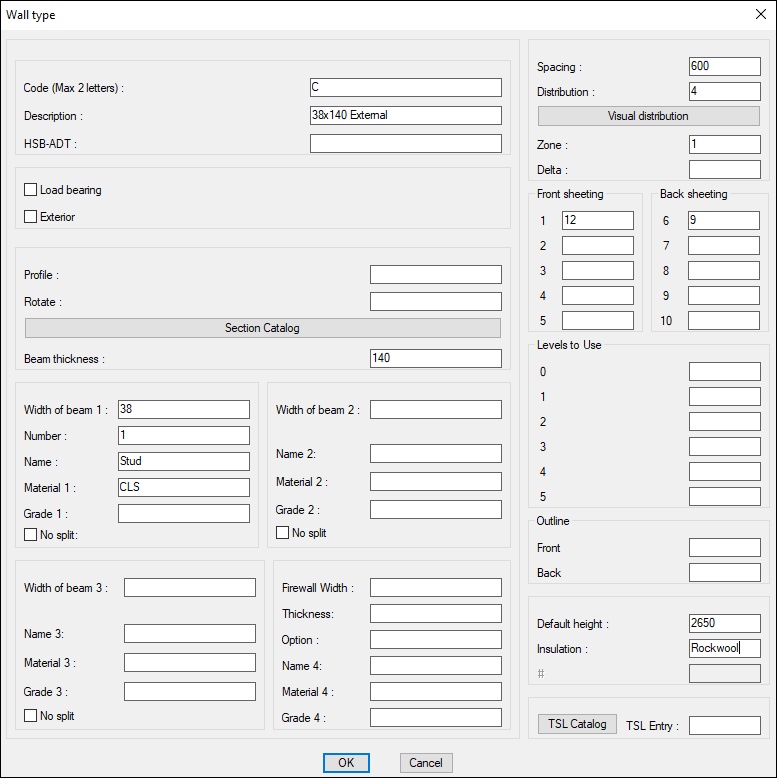
With the help of the Wall type dialog box you can define the studs, the name, the code, the spacing, the distribution and the thickness of the sheeting’s of the timber frame wall.
Code – Enter an alphabetical Wall code (AZ).You can use 1 letter code and go up to Maximum 2 letters (ABC or AAAB …etc) Every Wall has to have its own unique code. No Numbers are allowed.
Description - Enter a name for your wall. (an easy name for you to work with, this name will be used every time you draw a wall), the description has to have an unique name.
hsbADT – Enter an ADT type wall name.
Load Bearing –Select if this is a load bearing wall.
Exterior – Select if the wall is an exterior wall. (RDS (extra info)Output for model map)
Beam Profile – Enter the extrusion profile name of the beam. (only used when you have made extrusion profiles)
Rotate – Angle of the profile rotates around the X axis.
Section Catalog – The function of this command is to allow you to define beams (name, height, width, material, grade and max.length). You can also select a beam for using the predefined values in prevailing dialog box.
Beam Thickness – Enter the section height of the beam.
Width of beam 1 - Enter the width of the studs. (There must be an input of at least 0 at all studs. Although there is no second stud wanted).

Number - Enter the number of the studs. For example: if you input the number two there will be two studs on the distribution position instead of one.
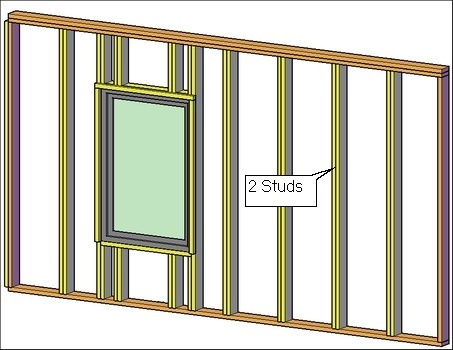
Name 1, 2, 3 - Enter a description of the stud.
Material 1, 2, and 3 - Enter a name for the material (for example:fir).
Grade 1, 2, 3 - Enter the grade of the wood.
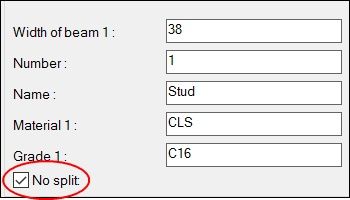
No Split - Check the box if you don't want to get split sheeting at this location.
Firewall Width – Enter the firewall width (Longest side in this drawing 100).
BLOCK_INFO_START
Note: You still need to fill in the normal Beam thickness and width so the beams around the wall can be created.
BLOCK__END
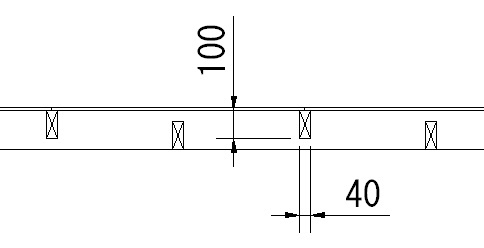
Thickness – Enter the firewall Thickness (shortest side in this drawing 40)
Option – Fill in 2 or 5.
Option 2: two beams opposite each other (don’t forget to change the width of the beam)

Option 5: two beams next to each other.

Name 4 – Enter a name for the firewall studs.
Material 4 – Enter a name for the material of the firewall studs (for example: fir).
Grade 4 – Enter the grade of the firewall studs.
Spacing – Enter the spacing distance for the studs.
Distribution – Select the rule of the distribution. (Enter a number between 1 to 18)
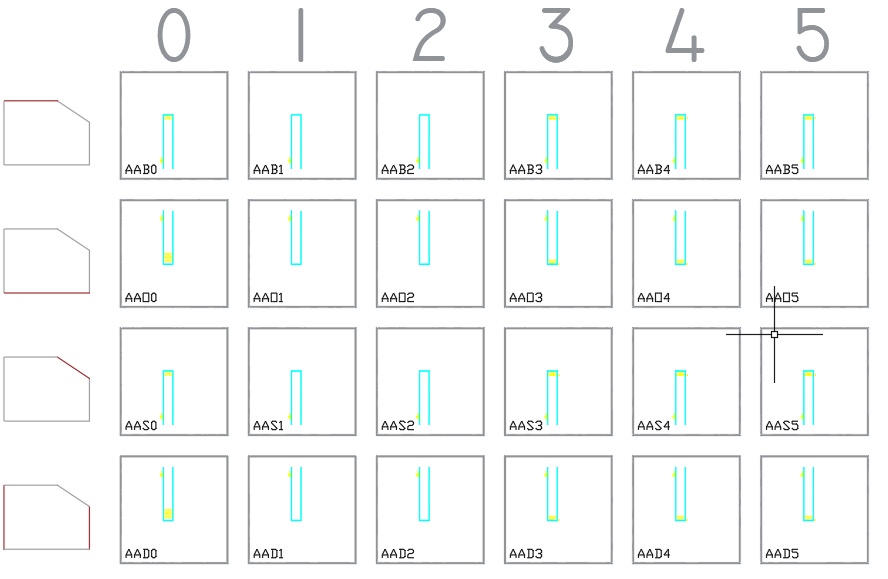
Visual Distribution – Have a look on the different types of distributions and select one. (There is a short description text below the pictures.)
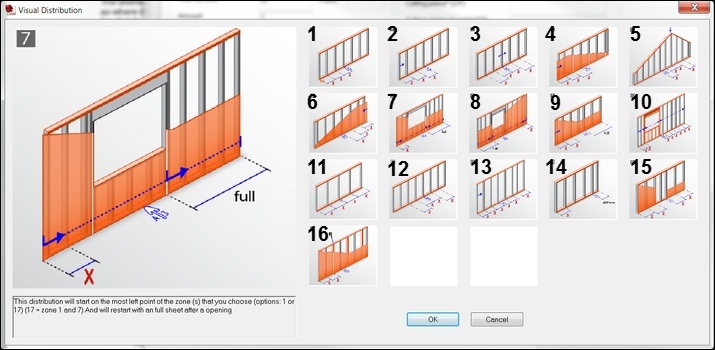
- 0-Point Domain – origin point of the drawing or placed distribution point. Also called distribution from grid. Studs are distributed based on a predefined base point using the hsbDistribution block. This block has to be inserted in the drawing using the command ‘hsbWall\Control Point for the Distribution of Studs’ and linked to the walls group (Floor Level), the block is given an attribute and this attribute value is also entered in the walls distribution zone. Distribution is Center to Center. NOTE: make sure the distribution point is in the same group as the hsbWalls (hsbConsole). Otherwise it will not work.
- Left Point Wall - This distribution will divide from the outer left point of the wall. Distribution is Center to Center.
- Mid Point Wall – This distributed will divide from midpoint of the wall. Distribution is Center to Center.
- Left On Zone –This distributed will start on the most left point of the zone that you choose. Distribution is Center to Center.
- Top – This distributed will start at the highest point of the wall, it will not care about any sheeting zones. Distribution is Center to Center.
- Spacing from Right side of Zone - This distributed will start on the most right point of the zone that you choose. Distribution is Center to Center.
- Spacing from Left, Restarting after opening – This distributed will start on the most left point of the zone that you choose. And will restart with a full sheet after an opening. Distribution is Center to Center.
- Spacing from Right, Restarting after opening – This distributed will start on the most right point of the zone that you choose. And will restart with a full sheet after an opening. Distribution is Center to Center.
- Spacing starts Left, with Last sheet Full – This distributed will start on the most left point of the zone that you choose. And will try to have a full sheet on the right end. You should use this opening in combination with the sheeting option (LeftRight). Distribution is Center to Center.
- Equal module at both side of window – This distributed will have an equal dividing of the studs, but it will do it on both sides of an opening. Distribution is Center to Center.
- Equal Spacing – This distributed will have an equal dividing. Distribution is between the studs and NOT Center to Center.
- Distribution based off Wall icon – This distributed will start dividing from the place of the green wall icon. Distribution is Center to center.
- Starts from Left, last sheet on Module – This distributed will start dividing from left and places the last stud on the module measurement from the right. Distribution is Center to Center.
- Left, last sheet 260mm – This distribution leaves a minimum peace of sheeting left on the right of 260mm – Distribution is Center to Center.
- Party Wall– This distribution is used together with the partywall dividing of the sheets. The dividing of the studs start from left and right. Distribution is Center to Center.
- Double stud - This distribution divides from the left and places a double stud on a sheet edge. Distribution is Center to Center.
- Studs are distributed based on a predefined base point using the hsbDistribution block. This block has to be inserted in the drawing using the command hsbWall\Control Point for the Distribution of Studs and linked to the walls group (Floor Level), the block is given an attribute and this attribute value is also entered in the walls distribution zone and will put a stud in the middle of an opening\window. Distribution is Center to Center.
- Horizontal - This distribution will put the beams horizontal. Distribution is Center to Center.
71. ………….This distribution only works with Vertical sheeting. For example you could be using Visual distribution type zone 4 with distribution type set to 1. What this will do is start you distribution from the left most point of your sheeting to allow sheeting maximization. By default distribution 4 will start left on a wall if no sheeting is on zone 1.
If you do have sheeting on zone 1 and it doesn’t start at the beginning of the wall, the stud distribution will start at the left most point of the sheeting.)
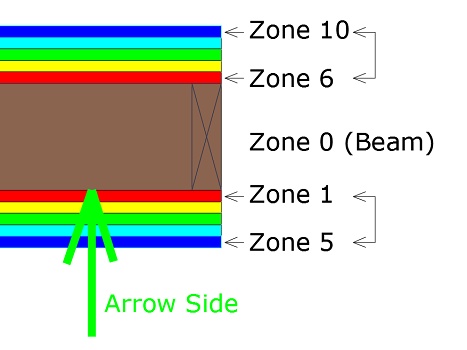
Zone – input a number for the zone. The distribution of the sheeting will be dependent on this zone. Distribution zone works in conjunction with Distribution types. The sheet zone(s) that you want the studs to distribute by. (from 1 to 10)
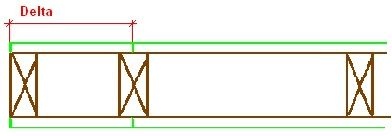
Delta – input the delta value. This means the distance from the wall end to the center of the first stud, where the distribution should start from.
Front Sheeting and Back Sheeting – Enter the thicknesses of the sheets.
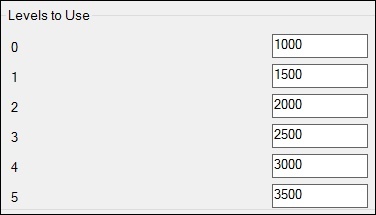
Levels to Use – Enter a height that each level should look at, for example when a wall is higher than 1000mm choice level 0, if the wall is higher than 1500mm choice level 1 and so on.
Outline

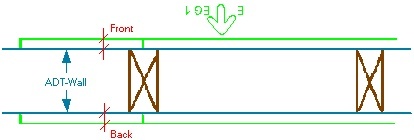
Front – you can set the difference between the sheeting on the most outer side on the icon side and the outline of the ADTWall. (see picture below)
Back – you can set the difference between the sheeting on the most outer side on the opposite side of the icon and the outline of the ADTWall. (see picture below)
Default Height – Enter the height of the wall. When you are going to draw a wall this height is set without making any changes Cutting plane height.
Insulation – Enter a description eg ‘Rockwool’, is not used anymore. A TSL is now used.
TSL Catalogue – Enter a Tsl name, once you select the button you will get the catalog to select from.
If you want to return to the original document How to make hsbWall Details in hsbcad 2017

